The H2 database is an in-memory database and is generally used for unit testing or POC purposes. Spring Boot provides excellent integration support for H2 using simple properties configuration. To make itself even more helpful, H2 also provides a console view to maintain and interact with the database tables and data using the GUI interface.
1. Maven and Gradle Dependencies
To use H2 in the Spring boot application, we need to add the H2 runtime jar into dependencies. The best way to add is through Maven. The version is maintained by Spring Boot’s BOM file, so we can skip it.
<dependency>
  <groupId>org.springframework.boot</groupId>
  <artifactId>spring-boot-starter-data-jpa</artifactId>
</dependency>
<dependency>
  <groupId>com.h2database</groupId>
  <artifactId>h2</artifactId>
  <scope>runtime</scope>
</dependency>
In Gradle, we can include the same dependencies as follows:
dependencies {
    implementation 'org.springframework.boot:spring-boot-starter-data-jpa'
    runtimeOnly 'com.h2database:h2'
}
2. H2 DataSource Configuration
Spring provides effortless configuration options to connect to any database using properties. Below are the configuration properties, we shall have in application.properties file for the most straightforward H2 configuration.
Please note by default, spring boot configures H2 database connection with the username 'sa' and an empty password. If you wish to change the username and password, override them in the above properties options.
spring.datasource.url=jdbc:h2:mem:testdb;DB_CLOSE_ON_EXIT=TRUE
spring.datasource.driverClassName=org.h2.Driver
spring.datasource.username=sa
spring.datasource.password=
spring.jpa.database-platform=org.hibernate.dialect.H2Dialect

spring.h2.console.enabled=true
spring.h2.console.path=/h2-console
spring.h2.console.settings.trace=false
The same configuration can be written in a YAML file as follows:
spring:
  datasource:
    url: jdbc:h2:mem:mydb
    username: sa
    password: password
    driverClassName: org.h2.Driver
  jpa:
    spring.jpa.database-platform: org.hibernate.dialect.H2Dialect
The same configuration can be written in a Java class file as follows. This is code, the EmbeddedDatabaseBuilder class uses the database creation and loading data scripts as arguments to create an instance of EmbeddedDatabase that implements DataSource.
Note that Spring supports HSQL (the default), H2, and DERBY databases.
The order of the SQL scripts is important, and the file that contains Data Definition Language (DDL) should always appear first, followed by the file with Data Manipulation Language (DML).
import org.springframework.jdbc.datasource.embedded.EmbeddedDatabaseBuilder;
import org.springframework.jdbc.datasource.embedded.EmbeddedDatabaseType;

@Configuration
public class EmbeddedJdbcConfig {

  private static Logger LOGGER = LoggerFactory.getLogger(EmbeddedJdbcConfig.class);

  @Bean
  public DataSource dataSource() {
    try {
      var dbBuilder = new EmbeddedDatabaseBuilder();
      return dbBuilder.setType(EmbeddedDatabaseType.H2)
          .addScripts("classpath:h2/schema.sql", "classpath:h2/test-data.sql")
          .build();
    } catch (Exception e) {
      LOGGER.error("Embedded DataSource bean cannot be created!", e);
      return null;
    }
  }
}
3. Persisting Database Changes on Restarts
By default, the in-memory databases are volatile, and all stored data will be lost when we restart the application. In this case, data is written in temporary memory, and as soon as JVM is stopped, data is flushed.
To have a persistent data store capable of storing data between application start/stop, we should hold the data in files. For this change the spring.datasource.url property.
spring.datasource.url = jdbc:h2:file:/temp/data/testdbSee Also: H2 Database Connection URLs
4. Initializing Schema and Data at Startup
In Spring Boot, by default, SQL database initialization is only performed when using an embedded in-memory database.
Script-based DataSource initialization is performed, by default, before any JPA EntityManagerFactory beans are created. So when using Hibernate, it is recommended to set ‘spring.jpa.defer-datasource-initialization‘ property to ‘false‘. It will make sure that DML statements are executed after the Hibernate (EntityManagerFactory bean) has been initialized properly.
spring.jpa.defer-datasource-initialization=trueFinally, the schema.sql can be used to create the schema for JPA-managed entities, and data.sql can be used to populate it.
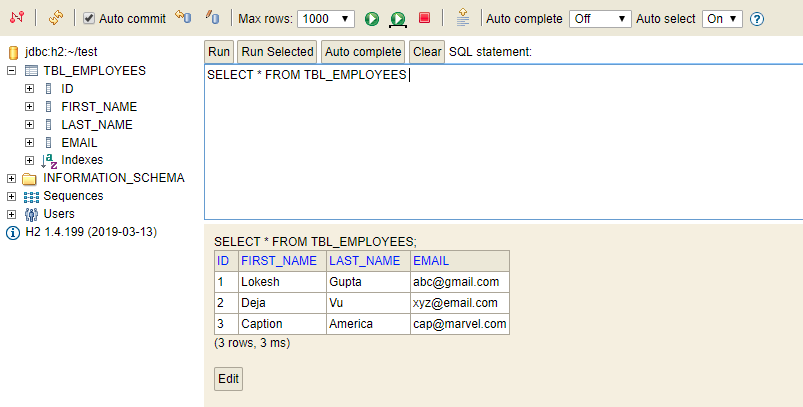
DROP TABLE IF EXISTS TBL_EMPLOYEES;

CREATE TABLE TBL_EMPLOYEES (
  id INT AUTO_INCREMENT  PRIMARY KEY,
  first_name VARCHAR(250) NOT NULL,
  last_name VARCHAR(250) NOT NULL,
  email VARCHAR(250) DEFAULT NULL
);
INSERT INTO TBL_EMPLOYEES (first_name, last_name, email) VALUES
('Lokesh', 'Gupta', 'abc@gmail.com'),
('Deja', 'Vu', 'xyz@email.com'),
('Caption', 'America', 'cap@marvel.com');5. Display SQL Logs
To display trace information for executed SQL statements in the H2 database, we can use the property: ‘spring.h2.console.settings.trace‘.
spring.h2.console.settings.trace=true6. Accessing H2 Console on Browser
6.1. Enabling H2 Console
By default, the console view of the H2 database is disabled. We must enable it to view and access it in the browser. Note that we can customize the URL of the H2 console, which, by default, is '/h2'.
spring.h2.console.enabled=true
spring.h2.console.path=/h2-console
6.2. Accessing H2 Console
Start the spring boot application and access the console in the browser with this URL : http://localhost:8080/h2.
We can see the console like this.
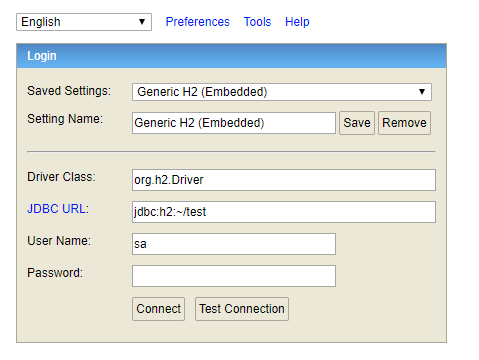
Now enter the configured username and password. We can verify the table structure and default data inserted through SQL files.
6.3. Enable Remote Access
We can enable/disable the remote access of the H2 console using the property ‘spring.h2.console.settings.web-allow-others‘. By default, its value is false.
spring.h2.console.settings.web-allow-others=false7. Conclusion
In this Spring Boot H2 example, we learned to configure, initialize and access the H2 database through a Spring Boot application using simple properties configuration options.
Happy Learning !!
Need to set folowing in application.properties
spring.jpa.hibernate.ddl-auto=none
for make data initialization working.
I am still not able to see it . Please guide if there could be any other problem . Have even added @Entity and @Id at the pojo class.
I have the same error. I am confused, do we have to make our own database. What should we put for JDBC url? Please help
“Database “C:/Users/sethy/test” not found, either pre-create it or allow remote database creation”
I am facing the same issue.Did you find any solution yet for this?
change the dburl to jdbc:h2:mem:testdb the same url from application.properties file in http://localhost:8080/h2/ console.
application.properties file:
spring.datasource.url=jdbc:h2:mem:testdb
Thanks, It worked
This solution didn’t work for me. Is there any other way around ?
Make sure you have following dependency in addition to ‘h2’ dependency:
org.springframework.boot
spring-boot-starter-data-jpa
Hi,
This solution works very fine but how do we avoid schema from re-creating itself again and again?
As the data.sql and schema.sql run every time the app started.
Use Persistent Database Configuration
i am getting this error
Database “C:/Users/sudhanshu/test” not found, either pre-create it or allow remote database creation (not recommended in secure environments) [90149–200] 90149/90149
Please try creating this folder “C:/Users/sudhanshu/test” before program execution.
I have created but the same issue
Try using test as db file(eg: test.db)
so url should be “jdbc:h2:file:C:/Users/sudhanshu/test”
Give this in JDBCURL: jdbc:h2:mem:testdb . By default it is auto-populated to ‘jdbc:h2:~/test’ , and this needs to be changed
Hi,
Thank for your article, but what if I want to change data.sql or schema.sql files. How can I do that?
I am getting this error: The method findById(Long) is undefined for the type EmployeeRepository
public EmployeeEntity getEmployeeById(Long id) throws RecordNotFoundException { Optional employee = repository.findById(id); if(employee.isPresent()) { return employee.get(); } else { throw new RecordNotFoundException("No employee record exist for given id"); } }using postman iam unable to insert data…saying status”:500,”error”:”Internal Server Error”,”message”:”The given id must not be null!
To fix this, change the controller method as below
public ResponseEntity createOrUpdateEmployee(@RequestBody EmployeeEntity employee) throws RecordNotFoundException