
Spring Boot is a widely popular framework and is commonly used to build monolith MVC applications, real-time applications as well as microservices. For web applications, Spring Boot provides tools for creating REST APIs, handling HTTP requests, and rendering views using template engines like Thymeleaf. Similarly, for microservices, Spring Boot supports Spring Cloud by using its features like service discovery, load balancing, and configuration management.
This article introduces the Spring boot framework to beginners and a step-by-step guide for creating your first Spring boot project serving the hello world message.
1. Introduction to Spring Boot
Spring Boot is an open-source framework that simplifies the development of stand-alone, production-grade Spring-based applications. Spring Boot is built on top of the Spring Framework and provides a variety of tools, libraries, and conventions to simplify the configuration and deployment of applications.
Spring Boot takes an opinionated view of the Spring platform and third-party libraries. When we add these libraries in the classpath, Spring boot automatically configures certain features from the library that are most obviously needed from it. Although, it allows to override, customize or completely disable the auto configurations for any module or library.
For example, if we want to add the persistence feature in our application, we only add the spring-boot-starter-data-jpa dependency in the project and it automatically does the followings:
- Includes the necessary dependencies such as Jakarta Persistence API (JPA) and Hibernate etc.
- Sets up the DataSource, EntityManagerFactory, and transaction management.
- Scans the application’s classpath for @Entity classes and registers them with context.
- Scans for JpaRepository or related interfaces and configures them.
- Reads database connection properties from application.properties and sets up a connection to the specified database.
- Configures default connection pooling to optimize database connections and reuse them efficiently.
Without Spring Boot, we will be configuring all the above features separately ourselves. Spring boot autoconfiguration takes away this pain, and does everything for us. We can further create specific beans or write custom properties to customize any of the above-listed features.
1.1. Notable Features of Spring Boot
The Spring Boot framework provides the following features in any ordinary application:
- Spring Boot Starters: Starters are pre-configured templates for common use cases, such as web applications, persistence, messaging, etc. The data-jpa or persistence starter we discussed in the introduction section.
- Auto-Configuration: Spring Boot uses a convention-over-configuration approach and automatically configures beans based on the project’s dependencies and settings.
- Embedded Servers: Spring Boot includes embedded servlet containers (the default is Tomcat) to run the application without requiring an external server.
- Production-Ready Features: Spring Boot provides production-ready features like health checks, metrics, security, and externalized configuration.
1.2. Limitations and Disadvantages of Spring Boot
Everything comes with a cost. Spring boot is also no exception to this. The followings are the limitations or disadvantages of using Spring Boot:
- Initial Learning Curve: Spring boot automatically does so many things under the hood that it may become overwhelming to keep track of everything for new developers. Without Spring boot, when we write everything ourselves, it takes time but gives us more control and confidence.
- Limited Flexibility when using Non-standard Libraries: Spring Boot’s auto-configuration approach may not always align with specific project requirements. For example, Spring Boot automatically configures HikariCP as the default connection pool implementation. Suppose, we want to have a custom connection pool internal to the organization. In this case, writing and using custom beans and custom non-standard properties may not align well with the Spring boot’s autoconfiguration.
- Complex Debugging: With the automatic configuration and behind-the-scenes magic, debugging complex issues can be challenging. The developers may not have full visibility into how components are being wired and acting together.
2. Prerequisites for a Spring Boot Application
Before we start developing our first application, make sure we have the following:
- Java Development Kit (JDK): The Spring Boot runs on Java. For Spring Boot 3.x, the minimum required version is Java 17. Spring Boot 2.x requires a minimum JDK 8 or above.
- Build Tool: A build tool such as Maven or Gradle will help in managing the project’s dependencies and build process.
- Integrated Development Environment (IDE): While it is possible to code and run the application in a text editor as well, using an IDE like IntelliJ IDEA, Eclipse, or Visual Studio Code helps with features such as code completion, automatic compilation, debugging, and project management.
Additionally, a basic knowledge of Java programming and Spring framework is expected. It will help you in going deeper into the magic of Spring boot.
3. Creating a New Spring Boot Project
For a beginner, the easiest way to create a new Spring boot project is using the Spring Initializr website. It allows us to choose the preferred build tools, Java version, and project dependencies in a single screen.
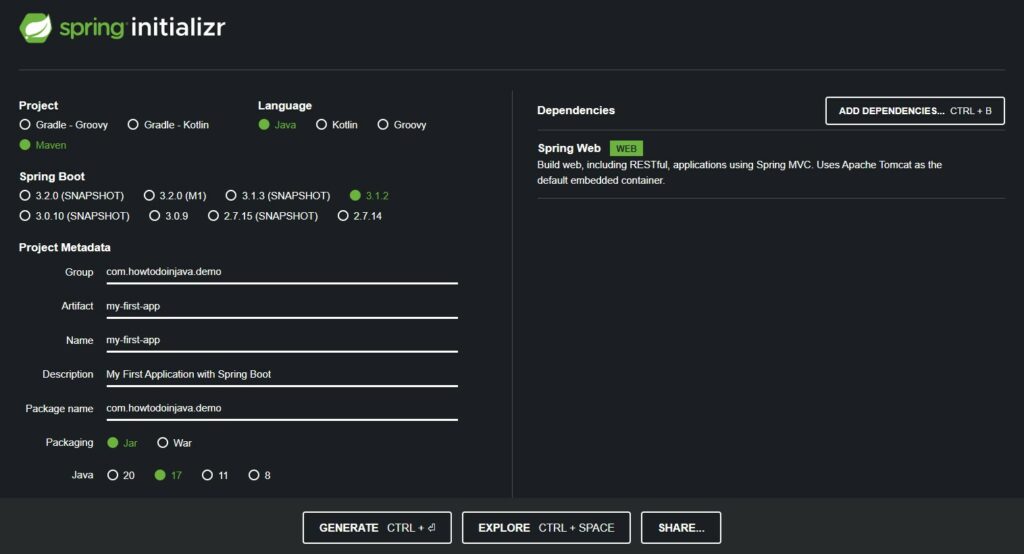
After choosing all preferences, we can download the project as a zip file and import it into the IDE as an existing Maven project. In this demo, we can use IntelliJ Idea for writing and executing the code.
4. Demystifying the Generated Code
Let us understand the code structure and the generated files in our application.
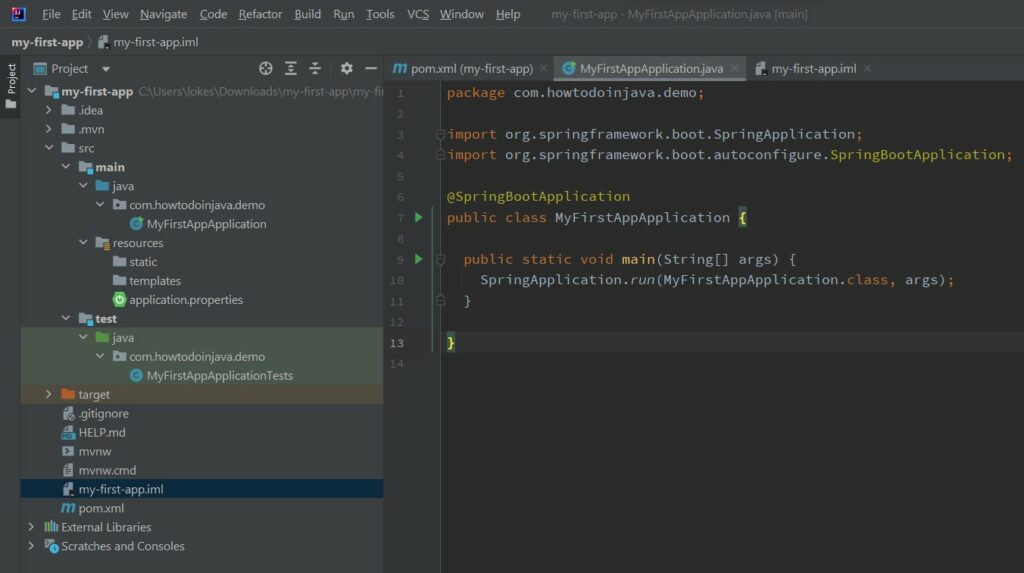
4.1. Project Structure
The main directories created in the project are:
- /src/main/java: contains the application’s Java source code. We write all new classes and interfaces in this directory.
- /src/test/java: contains the application’s test code. All new unit tests go in this directory.
- /src/main/resources: contains non-Java resources that the application uses. For example, properties files, view files, configuration files etc.
When we build the application, all the compiled files go into the /target directory. The build tool generated the deployment archive file (.jar or .war file) from this directory.
4.2. Generated Files
The main files generated from the tool are:
MyFirstAppApplication.java
It contains the main() method that is the starting point of the application runtime. It contains the @SpringBootApplication annotation. It internally triggers the bean auto-configuration and component scanning that configures all the beans in the application and registers them with the application context.
import org.springframework.boot.SpringApplication;
import org.springframework.boot.autoconfigure.SpringBootApplication;

@SpringBootApplication
public class MyFirstAppApplication {

  public static void main(String[] args) {
    SpringApplication.run(MyFirstAppApplication.class, args);
  }
}
MyFirstAppApplicationTests.java
It contains the Junit 5 tests to unit test the application code. We can create more such classes in the package.
@SpringBootTest
class MyFirstAppApplicationTests {

  @Test
  void contextLoads() {
  }
}
application.properties
It contains the default properties needed to configure a specific module. By default, it is empty.
pom.xml
It is the build file that manages the project’s dependencies and other libraries. We can add or remove the dependencies from this file.
Note that the spring-boot-starter-parent is a special Maven project that serves as a parent or super POM for all Spring Boot applications. Its version controls the default functionality provided by the starter modules and versions of the dependent libraries.
The spring-boot-maven-plugin is a Maven plugin provided by the Spring Team. It simplifies the process of building and packaging Spring Boot applications, making them executable and easy to deploy.
<?xml version="1.0" encoding="UTF-8"?>
<project ...>
  <modelVersion>4.0.0</modelVersion>

  <!-- The parent is always the spring-boot-starter-parent -->
  <parent>
    <groupId>org.springframework.boot</groupId>
    <artifactId>spring-boot-starter-parent</artifactId>
    <version>3.1.1</version>
    <relativePath/> <!-- lookup parent from repository -->
  </parent>

  <groupId>com.howtodoinjava.demo</groupId>
  <artifactId>my-first-app</artifactId>
  <version>0.0.1-SNAPSHOT</version>
  <name>my-first-app</name>
  <description>My First Application with Spring Boot</description>

  <properties>
    <java.version>17</java.version>
  </properties>

  <dependencies>
    <dependency>
      <groupId>org.springframework.boot</groupId>
      <artifactId>spring-boot-starter-web</artifactId>
    </dependency>
    <dependency>
      <groupId>org.springframework.boot</groupId>
      <artifactId>spring-boot-starter-test</artifactId>
      <scope>test</scope>
    </dependency>
  </dependencies>

  <build>
    <plugins>
      <plugin>
        <groupId>org.springframework.boot</groupId>
        <artifactId>spring-boot-maven-plugin</artifactId>
      </plugin>
    </plugins>
  </build>

</project>
5. Writing Your First Controller
The generated application only provides the necessary infrastructure and we must write additional business logic that is targeted toward the end users. For example, we can write a simple REST API that accepts the user’s input, connects to the backend database and return the appropriate response in JSON/XML format.
In this tutorial, we are writing a simple API that returns the message 'Hello, World!' in response. We create a new class HelloWorldController and write the following code.
import org.springframework.web.bind.annotation.GetMapping;
import org.springframework.web.bind.annotation.RestController;

@RestController
public class HelloWorldController {

  @GetMapping("hello")
  String hello() {
    return "Hello, World!";
  }
}
Writing advanced REST APIs is out of the scope of this article, still, you can read about them in more detail in the Spring Boot REST API Example – Step-by-Step Guide.
6. Build the Application
After creating the controller, we can test the API code in the IDE itself, and it is where the IDEs help.
In case, we are not using the IDEs, we must compile the application and build the application as an executable jar. This jar file can be run as a normal application from the command line.
mvn buildIt generates a jar file named my-first-app-0.0.1-SNAPSHOT.jar in the /target directory. We can customize the name of the generated jar file in the pom.xml file.
<build>
  <finalName>my-first-spring-boot-app</finalName>
  <plugins>
    <plugin>
      <groupId>org.springframework.boot</groupId>
      <artifactId>spring-boot-maven-plugin</artifactId>
    </plugin>
  </plugins>
</build>
Now we again run the ‘mvn package’ command, it creates the jar file with name: my-first-spring-boot-app.jar.
7. Running and Testing the Application
To run the application in the development environment, as discussed in the previous section, we can run directly from the IDE. To do so, right-click on the MyFirstAppApplication.java and choose the 'Run MyFirstAppApplication.main()' option.
The above command runs the application in the embedded Tomcat server that is automatically included with the spring-boot-starter-web module.

To run the application from the terminal or command prompt, we can use the command:
mvn spring-boot:runIt starts the application from the terminal and we can verify the same in printed logs.
[INFO] Scanning for projects...
[INFO]
[INFO] ----------------< com.howtodoinjava.demo:my-first-app >-----------------
[INFO] Building my-first-app 0.0.1-SNAPSHOT
[INFO] --------------------------------[ jar ]---------------------------------
[INFO] Attaching agents: []

  .   ____          _            __ _ _
 /\\ / ___'_ __ _ _(_)_ __  __ _ \ \ \ \
( ( )\___ | '_ | '_| | '_ \/ _` | \ \ \ \
 \\/  ___)| |_)| | | | | || (_| |  ) ) ) )
  '  |____| .__|_| |_|_| |_\__, | / / / /
 =========|_|==============|___/=/_/_/_/
 :: Spring Boot ::                (v3.1.2)

2023-08-09T16:40:26.550+05:30  INFO 21616 --- [main] c.h.demo.MyFirstAppApplication           : Starting MyFirstAppApplication using Java 19-loom with PID 21616 (C:\Users\lokes\Downloads\my-first-app\my-first-app\target\classes started by lokesh in C:\Users\lokes\Downloads\my-first-app\my-first-app)
...
...
...
2023-08-09T16:40:28.085+05:30  INFO 21616 --- [main] c.h.demo.MyFirstAppApplication           : Started MyFirstAppApplication in 2.091 seconds (process running for 2.486)
After the application is started, we can access the hello world API to validate that everything is working as expected.
curl -X GET http://localhost:8080/hello

//Prints Hello, World!
8. FAQs
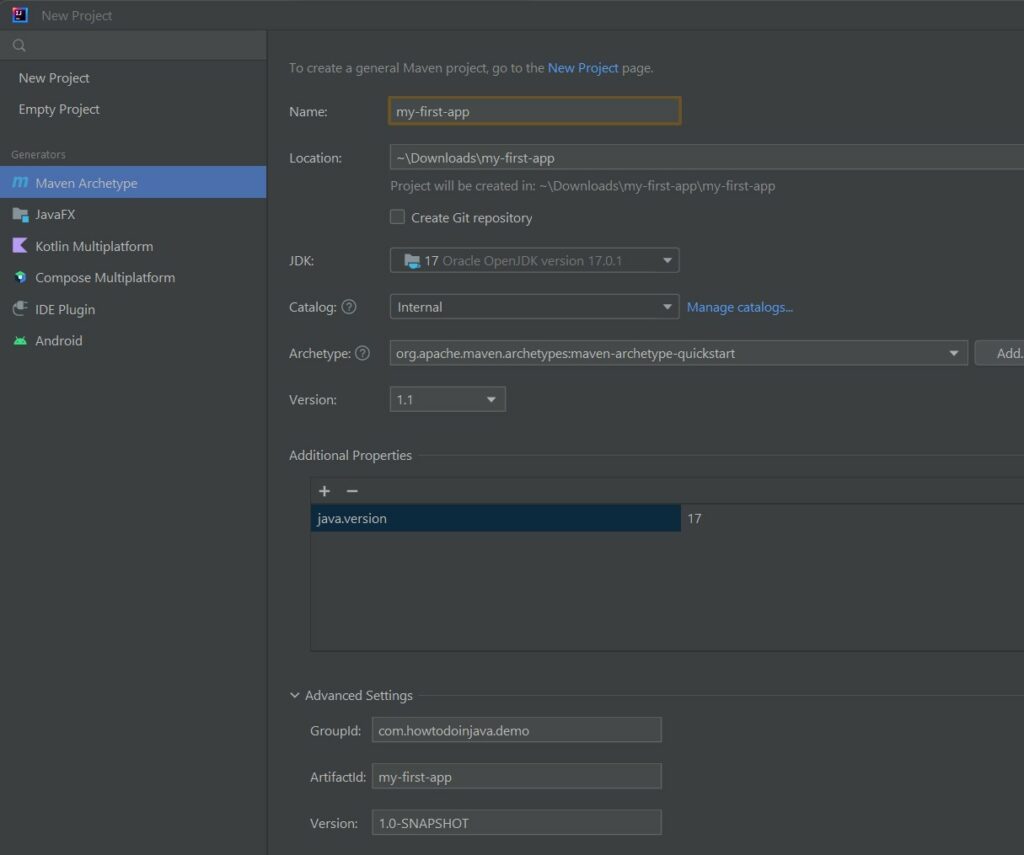
8.1. How to Create a New Spring Boot Application using Maven?
Creating a Spring boot project using Maven is similar to creating any other normal web project. After creating the project, we must add the pom.xml to refer to the parent pom spring-boot-starter-parent and create/modify other files.
mvn archetype:generate -DgroupId=com.howtodoinjava.demo \
-DartifactId=my-first-app \
-DarchetypeArtifactId=maven-archetype-quickstart \
-DinteractiveMode=false
8.2. How to Create a New Spring Boot Application using Spring Boot CLI?
The Spring Boot CLI is a command-line tool provided to streamline the development of Spring Boot applications. It offers a convenient way to quickly create, develop, and test Spring Boot projects without setting up complex project structures or manually configuring dependencies.
We can download the CLI from the official Spring Boot website or install it using a package manager like SDKMAN.
After the CLI is installed, navigate to the directory where we want to create the project, and run the following command:
spring init --dependencies=web \
--build=maven \
--groupId=com.howtodoinjava.demo \
--artifactId=my-first-app \
--name=MyFirstApp
It will create a Spring boot application from scratch and you can open the project in your favorite IDE and start making changes.
8.3. How to Create a Spring Boot Application in IntelliJ (or any other IDE)?
Creating a new Spring boot project in IntelliJ or any other IDE is similar to any other non-spring boot application. We create a normal Java project by selecting the appropriate maven coordinates and properties.
After creating the project, we must modify the pom.xml for parent pom references and import the additional spring boot starter modules and plugins.
9. Summary
This Spring Boot tutorial touched on the most basic concepts of the framework including features, advantages and disadvantages. Then we discussed the different ways to bootstrap a simple spring boot project e.g. using the Spring Initializr portal, command line and IDEs such as IntelliJ.
We developed a simple REST API, built the project and deployed it in the embedded Tomcat server. Finally, we tested the API, and it concludes this Spring boot getting started tutorial.
Happy Learning !!