Learn to write Spring Boot Async REST Controller using SseEmitter which is a specialization of ResponseBodyEmitter for sending Server-Sent Events. It helps in asynchronous request processing where one or more objects are written to the response and each object is written with a compatible HttpMessageConverter.
1. SseEmitter Class
The SseEmitter can deliver events from the server to the client. Server-Sent Events are messages from the server to the client. They have a ‘Content-Type‘ header of text/event-stream.
The events are pretty simple and have only four fields.
| Field | Description |
|---|---|
| id | The ID of the event |
| event | the type of event |
| data | The event data |
| retry | Reconnection time for the event stream |
2. How to use SseEmitter?
To send events from a request handling method, you need to create an instance of SseEmitter and return it from the request handling method. Then use the emitter.send() method to send individual elements to the client.
@RequestMapping(value="/resource-uri", method=RequestMethod.GET)
public SseEmitter handle()
{
     SseEmitter emitter = new SseEmitter();

     // Pass the emitter to a new thead for async processing...
     return emitter;
}

// in new thread
 emitter.send(dataset1);

 // and again
 emitter.send(dataset2);

 // and done
 emitter.complete();
If you want to add more info to the event, use the SseEventBuilder. The event() factory-method of the SseEmitter creates an instance. Use it to fill in the id and event fields.
SseEventBuilder eventBuilder = SseEmitter.event();

emitter.send(
                  eventBuilder
                  .data(dataSet)
                  .name("dataSet-created")
                  .id(String.valueOf(dataSet.hashCode()))
            );
3. Async REST Controller using SseEmitter
In the given controller method, we are accessing the data sets (use your own domain datatypes).
- There is a data service that returns datasets from DB or any other source.
- Each dataset is then processed (e.g. retrieving related information from another source) which takes time. This is simulated using an artificial delay by calling
thread.sleep()method. - Each data set is then added to
SseEmitterobject usingemitter.send()method. - Finally
emitter.complete()is called to mark that request processing is complete so that the thread responsible for sending the response can complete the request and be freed up for the next response to handle. - If any error is encountered while request processing, complete the process by
emitter.completeWithError(). The exception will pass through the normal exception handling of Spring MVC and after that, the response is completed.
@RestController
public class DataSetController {

	private final DataSetService dataSetService;

	public DataSetController(DataSetService dataSetService) {
		this.dataSetService = dataSetService;
	}

	@GetMapping("/emit-data-sets")
	public SseEmitter emitDataSets() {

		SseEmitter emitter = new SseEmitter();

		ExecutorService executor = Executors.newSingleThreadExecutor();

		//Creating a new thread for async processing
		executor.execute(() -> {
			List<DataSet> dataSets = dataSetService.findAll();
			try {
				for (DataSet dataSet : dataSets) {
					randomDelay();
					emitter.send(dataSet);
				}
				emitter.complete();
			} catch (IOException e) {
				emitter.completeWithError(e);
			}
		});
		executor.shutdown();

		return emitter;
	}

	private void randomDelay() {
		try {
			Thread.sleep(2000);
		} catch (InterruptedException e) {
			Thread.currentThread().interrupt();
		}
	}
}
4. Async Configuration
To override the default async behavior such as thread pool and timeout, we can implement the WebMvcConfigurer interface and override its configureAsyncSupport() method.
import org.springframework.context.annotation.Bean;
import org.springframework.context.annotation.Configuration;
import org.springframework.scheduling.annotation.EnableAsync;
import org.springframework.scheduling.concurrent.ThreadPoolTaskExecutor;
import org.springframework.web.servlet.config.annotation.AsyncSupportConfigurer;
import org.springframework.web.servlet.config.annotation.WebMvcConfigurer;

@Configuration
@EnableAsync
public class AsyncConfig implements WebMvcConfigurer {

  @Override
  public void configureAsyncSupport(AsyncSupportConfigurer configurer) {

    configurer.setTaskExecutor(mvcTaskExecutor());
    configurer.setDefaultTimeout(30_000);
  }

  @Bean
  public ThreadPoolTaskExecutor mvcTaskExecutor() {

    ThreadPoolTaskExecutor threadPoolTaskExecutor = new ThreadPoolTaskExecutor();
    threadPoolTaskExecutor.setCorePoolSize(10);
    threadPoolTaskExecutor.setThreadNamePrefix("mvc-task-");
    return threadPoolTaskExecutor;
  }
}
5. Test
5.1. JUnit Test
To test the above controller method, I am using mockito shipped with spring boot distribution.
@WebMvcTest(DataSetController.class)
public class DataSetControllerTest {

	@Autowired
	private MockMvc mockMvc;

	@MockBean
	private DataSetService dataSetService;

	@Test
	public void testFetchData() throws Exception {

		Mockito.when(dataSetService.findAll())
			.thenReturn(Arrays.asList(new DataSet(BigInteger.valueOf(1), "data")));

		MvcResult mvcResult = mockMvc.perform(get("/emit-data-sets"))
			.andExpect(request().asyncStarted())
			.andDo(MockMvcResultHandlers.log())
			.andReturn();

		mockMvc.perform(asyncDispatch(mvcResult))
			.andDo(MockMvcResultHandlers.log())
			.andExpect(status().isOk())
			.andExpect(content().json("{\"id\":1,\"name\":\"data\"}"));
	}
}
Trest output.
MockHttpServletResponse:
           Status = 200
    Error message = null
          Headers = {Content-Type=}
     Content type = text/event-stream;charset=UTF-8
             Body = data:{"id":1,"name":"data"}

    Forwarded URL = null
   Redirected URL = null
          Cookies = []
5.2. Browser Testing
To test in the browser, start the application using class SpringAsyncExampleApplication and hit the URL in the browser: http://localhost:8080/emit-data-sets
Check the response returned from the server coming in the form of events and delays between events.
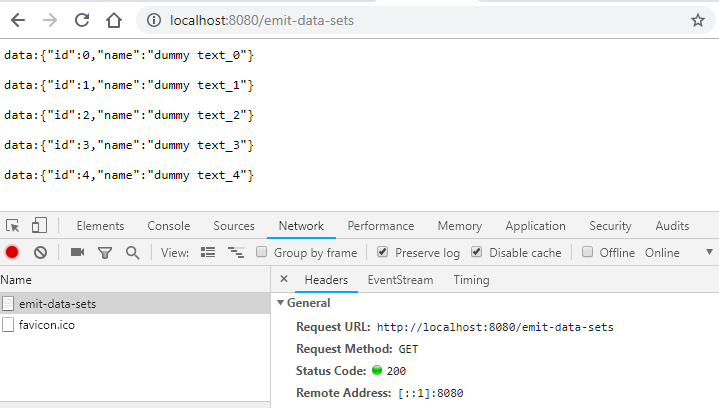
Notice the Content-Type header has a value of text/event-stream to indicate that we get a stream of events. The stream can be kept open and it will receive event notifications. Each object written is converted to JSON with an HttpMessageConverter. Each object is written in the data tag as the event data.
Let me know if you face any errors while executing this async rest controller example using SseEmitter in Spring boot 3.
Happy Learning !!