In Spring Security, a One-Time Token (OTT) is a server-side generated string that can be used only once for user authentication purpose. It is delivered to the user typically via email or SMS in the form of a magic link, on which user can click to login into the application. The OTT mechanism allows a user to log in without entering a password.
Please note that a one-time login URL will only work once. If we need access to login again or in another device/browser then we need to generate the OTT link again.
Also, unlike OTP (One-Time Password) that are generated by an external tool (e.g. authenticator apps), OTT do not require any external tool for generating or validating the tokens.
The OTT login feature is still in development and is not considered stable yet. This is expected to be shipped in Spring Security v6.4.0.

1. Implementing the Default One-Time Token (OTT) Login in Spring Boot Application
These the main steps to enable the default OTT login feature in a Spring Boot application.
1.1. Maven
To enable the One-Time Token feature, we need to include the spring-boot-starter-security and spring-boot-starter-web dependencies.
<properties>
  <java.version>21</java.version>
  <spring-security.version>6.4.0-SNAPSHOT</spring-security.version>
</properties>

<dependency>
  <groupId>org.springframework.boot</groupId>
  <artifactId>spring-boot-starter-security</artifactId>
</dependency>
<dependency>
  <groupId>org.springframework.boot</groupId>
  <artifactId>spring-boot-starter-web</artifactId>
</dependency>

<repositories>
  <repository>
    <id>repository.spring.snapshot</id>
    <name>Spring Snapshot Repository</name>
    <url>https://repo.spring.io/snapshot</url>
  </repository>
</repositories>
1.2. Enable One-Time Token Login
Currently, OTT login feature works along with form login feature. It means that we need to enable the form-login and Ott-login both in the Spring security configuration. In the following example, we enable One-Time Token Login with oneTimeTokenLogin() method.
import com.howtodoinjava.demo.service.OttService;
import org.springframework.context.annotation.Bean;
import org.springframework.context.annotation.Configuration;
import org.springframework.security.config.Customizer;
import org.springframework.security.config.annotation.web.builders.HttpSecurity;
import org.springframework.security.config.annotation.web.configuration.EnableWebSecurity;
import org.springframework.security.config.annotation.web.configurers.AbstractHttpConfigurer;
import org.springframework.security.config.annotation.web.configurers.HeadersConfigurer.FrameOptionsConfig;
import org.springframework.security.web.SecurityFilterChain;
import org.springframework.security.web.util.matcher.AntPathRequestMatcher;

@Configuration
@EnableWebSecurity
public class SecurityConfig {

  @Bean
  public SecurityFilterChain filterChain(HttpSecurity http) {

    http.authorizeHttpRequests((authorize) -> authorize
        .requestMatchers(new AntPathRequestMatcher("/login")).permitAll()
        .requestMatchers(new AntPathRequestMatcher("/ott/sent")).permitAll()
        .anyRequest().authenticated()
      )
      .csrf(AbstractHttpConfigurer::disable)
      // ...
      .formLogin(Customizer.withDefaults())	// Traditional login form setup
      .oneTimeTokenLogin(Customizer.withDefaults());	// Enable OTT login
    return http.build();
  }

  //...
}
By default, OneTimeTokenLoginConfigurer class is used to customize the default behavior of OTT login, including:
- Configures the filters DefaultLoginPageGeneratingFilter for token generation URL (
'/ott/generate') and DefaultOneTimeTokenSubmitPageGeneratingFilter for token processing URL ('/login/ott'). When submitting token, only POST requests are processed, so make sure to pass a valid CSRF token if CSRF protection is enabled. - Configures HTML templates for token generation and submit URLs.
- Configures InMemoryOneTimeTokenService which is an in-memory implementation of the OneTimeTokenService interface that uses a ConcurrentHashMap to store the generated OneTimeToken. A random UUID is used as the token value.
- Configures SimpleUrlAuthenticationFailureHandler for redirecting to “
/login?error” when authentication fails. - Configures SavedRequestAwareAuthenticationSuccessHandler which redirects the request to originally requested path after successful authentication.
1.3. Configure OneTimeTokenHandler
Even with default configuration, we must supply an implementation of GeneratedOneTimeTokenHandler interface which defines the strategy to handle generated one-time tokens. In this handler, we determine how to communicate the one-time login token to the user i.e. via email, SMS or any other medium.
In the following example, we are printing the token into the console.
http.
//...
.oneTimeTokenLogin(configurer -> configurer
  .generatedOneTimeTokenHandler((request, response, oneTimeToken) -> {

    var token = oneTimeToken.getTokenValue();
    var msg = "please go to http://localhost:8080/login/ott?token=" + token;
    System.out.println(msg);
  }));
1.4. Demo
Now, we can access the a secured page in the application and we can see the default OTT login form added to the form login page.

Enter the username of an application user in the text box and press “Send Token” button. This will generate the token and print the magic link in the console.

2. Sending Tokens to Emails
To send the token to the user email, Spring Security requires us to implement a custom GeneratedOneTimeTokenHandler.
2.1. Custom GeneratedOneTimeTokenHandler
The custom GeneratedOneTimeTokenHandler will be responsible to:
- Generate the magic link containing the one-time token.
- Find the email of the user by its username.
- Sending the token to user’s email.
- Redirect the user to a success page, as per application’s requirements.
import com.howtodoinjava.demo.model.User;
import com.howtodoinjava.demo.service.CustomUserDetailsService;
import com.howtodoinjava.demo.service.EmailService;
import jakarta.servlet.ServletException;
import jakarta.servlet.http.HttpServletRequest;
import jakarta.servlet.http.HttpServletResponse;
import java.io.IOException;
import org.springframework.security.authentication.ott.OneTimeToken;
import org.springframework.security.web.authentication.ott.GeneratedOneTimeTokenHandler;
import org.springframework.security.web.authentication.ott.RedirectGeneratedOneTimeTokenHandler;
import org.springframework.security.web.util.UrlUtils;
import org.springframework.stereotype.Component;
import org.springframework.web.util.UriComponentsBuilder;

@Component
public class EmailGeneratedOneTimeTokenHandler implements GeneratedOneTimeTokenHandler {

  private final EmailService emailService;
  private final CustomUserDetailsService userDetailsService;
  private final GeneratedOneTimeTokenHandler redirectHandler
    = new RedirectGeneratedOneTimeTokenHandler("/ott/sent");

  public EmailGeneratedOneTimeTokenHandler(EmailService emailService,
    CustomUserDetailsService userDetailsService) {

    this.emailService = emailService;
    this.userDetailsService = userDetailsService;
  }

  @Override
  public void handle(HttpServletRequest request, HttpServletResponse response,
    OneTimeToken oneTimeToken) throws IOException, ServletException {

    UriComponentsBuilder builder = UriComponentsBuilder.fromHttpUrl(UrlUtils.buildFullRequestUrl(request))
      .replacePath(request.getContextPath())
      .replaceQuery(null)
      .fragment(null)
      .path("/login/ott")
      .queryParam("token", oneTimeToken.getTokenValue());

    String magicLink = builder.toUriString();
    String email = getUserEmail(oneTimeToken.getUsername());

    this.emailService.sendEmail(email, "One Time Token for the Spring Security Demo App",
      "Use the following link to sign in into the application: " + magicLink);
    this.redirectHandler.handle(request, response, oneTimeToken);
  }

  private String getUserEmail(String username) {

    User user = userDetailsService.loadUserByUsername(username);
    return user.getEmail();
  }
}
2.2. Email Sender Service
For sending the emails, we are using JavaMailSender which is part of spring-boot-starter-mail dependency.
import org.springframework.mail.SimpleMailMessage;
import org.springframework.mail.javamail.JavaMailSender;
import org.springframework.stereotype.Component;

@Component
public class EmailService {

  private final JavaMailSender mailSender;

  public EmailService(JavaMailSender mailSender) {
    this.mailSender = mailSender;
  }

  public void sendEmail(String to, String subject, String body) {
    System.out.println("Sending email to: " + to + " with subject: " + subject + " and body: " + body);

    SimpleMailMessage message = new SimpleMailMessage();
    message.setTo(to);
    message.setSubject(subject);
    message.setText(body);

    mailSender.send(message);
    System.out.println("Mail sent");
  }
}
Do not forget to configure the SMTP server details the application.properties file.
spring.mail.host=sandbox.smtp.mailtrap.io
spring.mail.port=2525
spring.mail.username=<hidden>
spring.mail.password=<hidden>
2.3. Success URL
After the email is sent, we may want to display a success page and ask user to check his/her email. For this, have used the RedirectGeneratedOneTimeTokenHandler in the token handler class that performs a redirect to a specified location after the token has been sent.
In our case, we are forwarding to the URL /ott/sent. We can create a MVC handler mapping and view for this URL.
@Controller
@RequestMapping("/ott")
public class OttPageController {

  @GetMapping("/sent")
  String ottSent() {
    return "ott-sent";
  }
}
The view is a static Thymeleaf page. Please change as per your requirements.
<!DOCTYPE html>
<html xmlns="http://www.w3.org/1999/xhtml" xmlns:th="https://www.thymeleaf.org">
<head>
  <title>Link sent</title>
  <meta charset="utf-8"/>
</head>
<body>
<p>An email has been sent to you. Use the provided link to log in.</p>
<p><a href="/login" th:href="@{/login}">Back to login</a></p>
</body>
</html>
2.4. Storing and Retrieving User Email
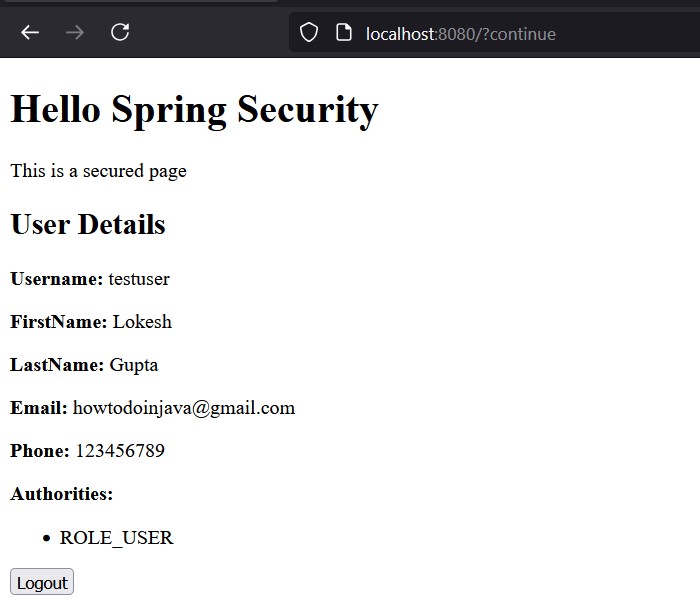
Please note that for the demo purposes, we have created a custom UserDetails object that has the information of user’s email and phone number as well.
@Entity(name = "user")
@Table(name = "tbl_user")
@Data
public class User implements UserDetails {

  @Id
  @GeneratedValue(strategy = GenerationType.IDENTITY)
  private Long id;

  @Column
  private String firstName;

  @Column
  private String lastName;

  @Column
  private String username;

  @Column
  private String password;

  @Column(unique = true)
  private String email;

  @Column(unique = true)
  private String phone;

  @Override
  public Collection<? extends GrantedAuthority> getAuthorities() {
    return List.of(new SimpleGrantedAuthority("ROLE_USER"));
  }

  @Override
  public String getUsername() {
    return this.username;
  }
}
The User object is stored and fetched using the UserRepository interface which is a standard JpaRepository.
@Repository
public interface UserRepository extends JpaRepository<User, Long> {

  Optional<User> findByUsername(String username);
}
We will also need to create custom UserDetailsService implementation that we can configure into AuthenticationManager so that the normal Spring security flow will use the User object we created.
import com.howtodoinjava.demo.model.User;
import com.howtodoinjava.demo.repository.UserRepository;
import org.springframework.security.core.userdetails.UserDetailsService;
import org.springframework.security.core.userdetails.UsernameNotFoundException;
import org.springframework.stereotype.Service;

@Service
public class CustomUserDetailsService implements UserDetailsService {

  private final UserRepository userRepository;

  public CustomUserDetailsService(UserRepository userRepository) {
    this.userRepository = userRepository;
  }

  @Override
  public User loadUserByUsername(String username) throws UsernameNotFoundException {
    return userRepository.findByUsername(username)
      .orElseThrow(() -> new UsernameNotFoundException("User not found"));
  }
}
2.5. Updated Security Configuration
Finally, we will update the Spring security configuration to use the CustomUserDetailsService and EmailGeneratedOneTimeTokenHandler classes.
@Configuration
@EnableWebSecurity
public class SecurityConfig {

  @Bean
  public SecurityFilterChain securityFilterChain(HttpSecurity http,
    EmailGeneratedOneTimeTokenHandler oneTimeTokenHandler) throws Exception {

    http.authorizeHttpRequests((authorize) -> authorize
        //..
      )
      .formLogin(Customizer.withDefaults())
      .csrf(AbstractHttpConfigurer::disable)
      .headers(httpSecurityHeadersConfigurer -> {
        httpSecurityHeadersConfigurer.frameOptions(FrameOptionsConfig::disable);
      })
      .logout(Customizer.withDefaults())
      .oneTimeTokenLogin(configurer -> configurer
        .generatedOneTimeTokenHandler(oneTimeTokenHandler)
      );

    return http.build();
  }

  @Bean
  public AuthenticationManager authenticationManager(
  	CustomUserDetailsService userDetailsService) {

    DaoAuthenticationProvider daoAuthenticationProvider = new DaoAuthenticationProvider();
    daoAuthenticationProvider.setUserDetailsService(userDetailsService);
    daoAuthenticationProvider.setPasswordEncoder(passwordEncoder());
    return new ProviderManager(daoAuthenticationProvider);
  }

  @Bean
  public PasswordEncoder passwordEncoder() {
    return PasswordEncoderFactories.createDelegatingPasswordEncoder();
  }
}
2.6. Demo
For demo, we have added a ‘testuser‘ into the database on application startup.
@SpringBootApplication
public class SpringSecurityOneTimeTokenApplication implements CommandLineRunner {
//..
@Autowired
UserRepository userRepository;
@Override
public void run(String... args) throws Exception {
User user = new User();
user.setFirstName("Lokesh");
user.setLastName("Gupta");
user.setEmail("howtodoinjava@gmail.com");
user.setPhone("123456789");
user.setUsername("testuser");
user.setPassword("password");
userRepository.save(user);
}
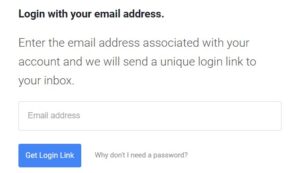
}Start the application and access any secured URL. You will be given a login page. Enter the username as ‘testuser‘ and press ‘Send Token’ button.
The success page will be displayed with the configured message.

We can also verify the email in MailTrap.io inbox that we are using as SMTP server in our demo.

Click on the linl. Or copy the link and paste in the browser. This will open the token submit page and the token value is pre-populated directly from the request parameter.

Click on the Sign In button. The token is validated by the Spring security and we will be able to access the secured URL.
3. Storing Token into Database
By default, Spring security uses InMemoryOneTimeTokenService which uses ConcurrentHashMap for storing the tokens and corresponding usernames. So as soon as we restart the server, all the generated tokens will be lost and thus become invalid.
Also, the default generated tokens are valid only for 5 minutes which may not be sufficient duration to allow the user to login.
A better approch is to store the token and their expiration time in the database. This will prevent the loss of tokens during server restarts. Also, it gives us chance to configure a custom token expiration time.
3.1. OneTimeToken Entity and Repository
First thing first. To store the token in database, we must create a JPA entity and corresponding repository. The Spring security OTT feature expects a org.springframework.security.authentication.ott.OneTimeToken implementation to be used as a valid token class.
@Entity(name = "ott")
@Table(name = "tbl_ott_token")
@Data
@NoArgsConstructor
public class OttToken implements OneTimeToken {

  public OttToken(String token, String username, Instant expireAt) {

    Assert.hasText(token, "token cannot be empty");
    Assert.hasText(username, "username cannot be empty");
    Assert.notNull(expireAt, "expireAt cannot be null");

    this.tokenValue = token;
    this.username = username;
    this.expiresAt = expireAt;
  }

  @Id
  @GeneratedValue(strategy = GenerationType.IDENTITY)
  private Long id;

  @Column
  private String username;

  @Column
  private String tokenValue;

  @Column
  private Instant expiresAt;
}
And the OttTokenRepository will be a simple JpaRepository. It has only one method findByTokenValue() that will search for the summitted token value in the database to identify which user is trying to login.
@Repository
public interface OttTokenRepository extends JpaRepository<OttToken, Long> {

  Optional<OttToken> findByTokenValue(String tokenValue);
}
3.2. Create Custom OneTimeTokenService
To replace the default InMemoryOneTimeTokenService, we need to create a custom implementation of OneTimeTokenService interface. This class will be responsible for:
- Generating the token and storing in the database.
- Verifying the submitted token during login.
- Validating if the token is already expired?
In the following example, we are using OttTokenRepository to store the token and fetch the record using token value. While fetching the token, if the token is found, we delete teh token immidiately so it cannot be used again.
Also, we are setting the token expiration to 8 hours.
import com.howtodoinjava.demo.model.OttToken;
import com.howtodoinjava.demo.repository.OttTokenRepository;
import java.time.Clock;
import java.time.Instant;
import java.time.temporal.ChronoUnit;
import java.util.Optional;
import java.util.UUID;
import org.springframework.lang.NonNull;
import org.springframework.security.authentication.ott.DefaultOneTimeToken;
import org.springframework.security.authentication.ott.GenerateOneTimeTokenRequest;
import org.springframework.security.authentication.ott.OneTimeToken;
import org.springframework.security.authentication.ott.OneTimeTokenAuthenticationToken;
import org.springframework.security.authentication.ott.OneTimeTokenService;
import org.springframework.stereotype.Service;

@Service
public class CustomOneTimeTokenService implements OneTimeTokenService {

  private final Clock clock = Clock.systemUTC();
  private final OttTokenRepository tokenRepository;

  public CustomOneTimeTokenService(OttTokenRepository tokenRepository) {
    this.tokenRepository = tokenRepository;
  }

  @Override
  @NonNull
  public OneTimeToken generate(GenerateOneTimeTokenRequest request) {

    String token = UUID.randomUUID().toString();
    Instant eightHoursFromNow = this.clock.instant().plus(8, ChronoUnit.HOURS);
    OttToken ott = new OttToken(token, request.getUsername(), eightHoursFromNow);
    tokenRepository.save(ott);
    return ott;
  }

  @Override
  public OneTimeToken consume(OneTimeTokenAuthenticationToken authenticationToken) {

    Optional<OttToken> ott = tokenRepository.findByTokenValue(authenticationToken.getTokenValue());

    if (ott.isPresent()) {
      OttToken token = ott.get();
      if (!isExpired(token)) {
        tokenRepository.delete(token);
        return new DefaultOneTimeToken(token.getTokenValue(), token.getUsername(), token.getExpiresAt());
      }
      tokenRepository.delete(token);
    }
    return null;
  }

  private boolean isExpired(OttToken ott) {
    return this.clock.instant().isAfter(ott.getExpiresAt());
  }
}
3.3. Update Security Configuration
Update the oneTimeTokenLogin() customizer to use the custom OneTimeTokenService in place of in-memory implementation.
@Bean
public SecurityFilterChain securityFilterChain(HttpSecurity http,
  EmailGeneratedOneTimeTokenHandler oneTimeTokenHandler,
  CustomOneTimeTokenService customOneTimeTokenService) throws Exception {

  http.
  //...
    .oneTimeTokenLogin(configurer -> configurer
	    .generatedOneTimeTokenHandler(oneTimeTokenHandler)
	    .oneTimeTokenService(customOneTimeTokenService)	//Database-backed OneTimeTokenService
	  );

	return http.build();
}
3.4. Demo
Similar to previous demos, enter the username into the login screen and click on “Send token“. The generated token will be sent in the email. Next, we will inspect the database for the stored token:
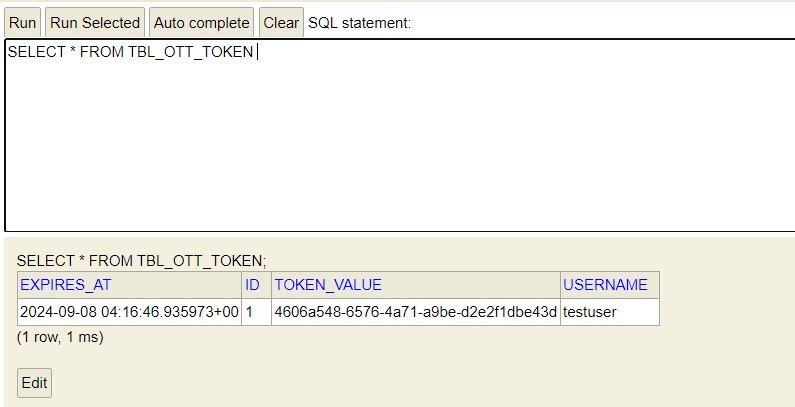
After we login using the magic link sent to the email, the token is deleted from the database.
4. Cleaning Up Expired Tokens
In production, not all the generated tokens will be used for login. Several will be abondanded by the user. In such case, it makes sense to cleanup expired tokens after certain delay.
There can be several approaches to clean up the tokens such as manual process (a REST endpoint that admin can invoke when the cleanup is required) or a scheduled job running every defined interval.
The following is a simple Spring scheduled task that runs every 1 hour and remove all expired tokens from the database.
import com.howtodoinjava.demo.repository.OttTokenRepository;
import jakarta.transaction.Transactional;
import java.time.Instant;
import org.springframework.scheduling.annotation.Scheduled;
import org.springframework.stereotype.Component;

@Component
public class OttCleanUpJob {

  private final OttTokenRepository tokenRepository;

  public OttCleanUpJob(OttTokenRepository tokenRepository) {
    this.tokenRepository = tokenRepository;
  }

  @Scheduled(fixedRate = 3600000) // 3600000 ms = 1 hour
  @Transactional
  public void cleanUpOldRecords() {

    System.out.println("Deleting expired tokens");
    int deleted = tokenRepository.deleteExpiredTokens(Instant.now());
    System.out.println("Deleted " + deleted + " expired tokens");
  }
}
Notice that we have added Query method to the repository that executes a native query to delete the expired tokens. Please feel free to customize the logic.
@Repository
public interface OttTokenRepository extends JpaRepository<OttToken, Long> {

  //...

  @Modifying
  @Transactional
  @Query("DELETE FROM ott e WHERE e.expiresAt < :currentTimestamp")
  int deleteExpiredTokens(Instant currentTimestamp);
}
Now everytime the job runs, it will delete all the expired one-time tokens from the database.
5. Conclusion
The One-Time Token (OTT) based login feature looks very promising as it removes the need to have a password based login functionality in the application. Passwords are known to be attacked and always a target of hackers. Every day, more and more applications are moving towards 2FA (2 Factor-Authentication), MFA (Multi Factor-Authentication) and now password-less One-Time Token Links.
In Spring security, the OTT feature is still under development, and we may see some new as well as updated features from the above discussed implementation details. You may try this feature and share your reviews/suggestions in the official GitHub repository.
Happy Learning !!
Reference: Spring Security Docs
Comments