Learn how to access DynamoDB from a Spring Boot application. We’ll create a few REST APIs and perform CRUD operations on a locally deployed DynamoDB instance. To connect to a remotely deployed instance, only changing the properties shall be sufficient.
1. Intro to AWS DynamoDB
DynamoDB is a fully managed, key-value NoSQL database by Amazon, designed to run high-performance applications at any scale. DynamoDB offers built-in security, continuous backups, automated multi-Region replication, in-memory caching, and data import and export tools. To learn more about DynamoDB, we can check the official documentation.
To avoid creating an AWS account and incurring any cost of running a live instance, let’s install and deploy DynamoDB locally. Check out the instructions on how to set up DynamoDB locally. The local instance can run as an executable JAR file or a docker container.
docker run amazon/dynamodb-local
Note that currently there is no support planned by AWS SDK team to move from javax.* namespace to jakarta.* namespace, so we may face issues while running DynamoDbLocal with Spring Boot 3 during integration testing.With spring-cloud-aws 3.x, we can use Spring boot 3 seemlessly to connect with AWS and perform operations on DynamoDB.
2. Connecting with DynamoDB
There are two standard ways to connect to DynamoDB from a Spring application:
- Using Spring Data Repository interface
- Using DynamoDBMapper
In this article, we will discuss both ways.
2.1. Maven
To configure and connect with DynamoDB, we must provide the latest version of aws-java-sdk-dynamodb and spring-data-dynamodb dependencies.
<dependency>
      <groupId>com.amazonaws</groupId>
      <artifactId>aws-java-sdk-dynamodb</artifactId>
      <version>1.12.423</version>
</dependency>
<dependency>
      <groupId>io.github.boostchicken</groupId>
      <artifactId>spring-data-dynamodb</artifactId>
      <version>5.2.5</version>
</dependency>
2.2. DB Mapper and Client Configuration
Next, let’s add the following connection properties to the application.properties file. Note that the access and secret keys can have any random value for our local setup. When accessing a local instance of DynamoDB, these values are not used for authentication.
For connecting to a remotely installed instance, we can provide the actual keys and endpoint that we get after creating a database instance and a database user in AWS.
aws.dynamodb.accessKey=accessKey
aws.dynamodb.secretKey=secretKey
aws.dynamodb.endpoint=http://localhost:8000
aws.dynamodb.region=ap-south-1
Next, we will be writing a configuration class for DynamoDB, which dynamically pulls properties from the application.properties file using @Value annotation and injects them into the variables defined. Then we will use these variables to configure DynamoDBMapper and connect with DynamoDB.
import com.amazonaws.auth.AWSCredentialsProvider;
import com.amazonaws.auth.AWSStaticCredentialsProvider;
import com.amazonaws.auth.BasicAWSCredentials;
import com.amazonaws.client.builder.AwsClientBuilder;
import com.amazonaws.services.dynamodbv2.AmazonDynamoDB;
import com.amazonaws.services.dynamodbv2.AmazonDynamoDBClientBuilder;
import com.amazonaws.services.dynamodbv2.datamodeling.DynamoDBMapper;
import com.amazonaws.services.dynamodbv2.datamodeling.DynamoDBMapperConfig;
import org.socialsignin.spring.data.dynamodb.repository.config.EnableDynamoDBRepositories;
import org.springframework.beans.factory.annotation.Value;
import org.springframework.context.annotation.Bean;
import org.springframework.context.annotation.Configuration;
import org.springframework.context.annotation.Primary;

@Configuration
@EnableDynamoDBRepositories(basePackages = {"com.howtodoinjava.demo.repositories"})
public class DynamoDbConfiguration {

  @Value("${aws.dynamodb.accessKey}")
  private String accessKey;

  @Value("${aws.dynamodb.secretKey}")
  private String secretKey;

  @Value("${aws.dynamodb.region}")
  private String region;

  @Value("${aws.dynamodb.endpoint}")
  private String endpoint;

  private AWSCredentialsProvider awsDynamoDBCredentials() {
    return new AWSStaticCredentialsProvider(
        new BasicAWSCredentials(accessKey, secretKey));
  }

  @Primary
  @Bean
  public DynamoDBMapperConfig dynamoDBMapperConfig() {
    return DynamoDBMapperConfig.DEFAULT;
  }

  @Bean
  @Primary
  public DynamoDBMapper dynamoDBMapper(AmazonDynamoDB amazonDynamoDB,
                                       DynamoDBMapperConfig config) {
    return new DynamoDBMapper(amazonDynamoDB, config);
  }

  @Bean
  public AmazonDynamoDB amazonDynamoDB() {

    return AmazonDynamoDBClientBuilder.standard()
        .withEndpointConfiguration(new AwsClientBuilder.EndpointConfiguration(endpoint, region))
        .withCredentials(awsDynamoDBCredentials()).build();
  }
}
Let us understand the above configuration –
- AWSCredentialsProvider: is the interface for providing AWS credentials. We are giving static credentials that don’t change, we can also provide complicated implementations, such as integrating with existing key management systems. The caller can use these credentials to authorize an AWS request.
- AmazonDynamoDB: Create a new client for accessing DynamoDB using the endpoint URL, region and credentials.
- DynamoDBMapper: Constructs a new mapper with the service object and configuration given. It enables us to perform various create, read, update, and delete (CRUD) operations on items and run queries and scans against tables.
2.3. Custom DynamoDBMapperConfig
In the above configuration, we configured DyanmoDB with default behaviors; we can override these defaults by using the DynamoDBMapperConfig bean as shown below.
@Primary
@Bean
public DynamoDBMapperConfig dynamoDBMapperConfig() {

	return DynamoDBMapperConfig.builder()
		.withSaveBehavior(DynamoDBMapperConfig.SaveBehavior.UPDATE)
		.withConsistentReads(DynamoDBMapperConfig.ConsistentReads.EVENTUAL)
		.withTableNameOverride(null)
		.withPaginationLoadingStrategy(DynamoDBMapperConfig.PaginationLoadingStrategy.LAZY_LOADING)
		.build();
}- DynamoDBMapperConfig.SaveBehavior – Specifies how the mapper instance should deal with attributes during save operations. The default is UPDATE.
- UPDATE – during a save operation, all attributes where data is changed are updated, and the attributes where data isn’t changed remain unaffected. Primitive number types, such as byte, int, and long, are set to 0, and object types are set to null.
- CLOBBER – clears and replaces all attributes, including where data isn’t changed, during a save operation. This is done by deleting the item and re-creating it. Versioned field constraints are also disregarded.
- DynamoDBMapperConfig.ConsistentReads – Specifies the consistency of read behavior. The default value is “EVENTUAL”.
- EVENTUAL – the mapper instance uses an eventually consistent read request. This means that the response might not reflect the latest changes made to the database, but we can expect lower latency and cost.
- CONSISTENT – the mapper instance will use a strongly consistent read request, which can be used with load, query, or scan operations. It is important to note that strongly consistent reads can have implications for performance and billing.
- DynamoDBMapperConfig.TableNameOverride – allows the mapper instance to ignore the table name specified by @DynamoDBTable and instead use a custom table name of our choosing. This feature is particularly useful in scenarios where data needs to be partitioned across multiple tables during runtime.
3. Model/Entity
Let’s create a model class MovieDetail. This POJO will use the following AWS-DynamoDB-specific annotations (quite similar to Hibernate) to define the table names, attributes, keys, and other aspects of the table.
- @DynamoDBTable – Identifies the target table in DynamoDB.
- @DynamoDBHashKey – Maps a class property to the partition key of the table.
- @DynamoDBAutoGeneratedKey – Marks a partition key or sort key property as being autogenerated.
DynamoDBMappergenerates a random UUID when saving these attributes. Only String properties can be marked as autogenerated keys. - @DynamoDBAttribute – Maps a property to a table attribute.
import com.amazonaws.services.dynamodbv2.datamodeling.DynamoDBAttribute;
import com.amazonaws.services.dynamodbv2.datamodeling.DynamoDBAutoGeneratedKey;
import com.amazonaws.services.dynamodbv2.datamodeling.DynamoDBHashKey;
import com.amazonaws.services.dynamodbv2.datamodeling.DynamoDBTable;
import lombok.Data;

@Data
@DynamoDBTable(tableName = "tbl_movie_dtl")
public class MovieDetail {

    @DynamoDBHashKey
    @DynamoDBAutoGeneratedKey
    private String id;

    @DynamoDBAttribute(attributeName = "title")
    private String title;

    @DynamoDBAttribute(attributeName = "year_released")
    private Date year;

    @DynamoDBAttribute(attributeName = "genre")
    private String genre;

    @DynamoDBAttribute(attributeName = "country")
    private String country;

    @DynamoDBAttribute(attributeName = "duration")
    private Integer duration;

    @DynamoDBAttribute(attributeName = "language")
    private String language;
}
4. CRUD Operations using Repository
4.1. Repository
Next, we need to create a MovieDetailRepository interface to define the CRUD functionality we want to build out. This interface will interact with DynamoDB to read and persist data.
@org.socialsignin.spring.data.dynamodb.repository.EnableScan;
public interface MovieDetailsRepository extends CrudRepository<MovieDetails, String> {
}
Note that @EnableScan annotation allows us to query the table with an attribute that’s not a partition key. Likewise, we don’t need @EnableScan when we are querying an index with its partition Key.
2.4. Disable Repository Scanning if Spring Data is Included
By default, if we add the Spring Boot Data (spring-boot-starter-data-jpa) dependency then autoconfiguration tries to enable all JPA repositories in the classpath. We can exclude the dynamodb repository from autoconfiguration as follows:
@SpringBootApplication
@EnableJpaRepositories(excludeFilters =
  @ComponentScan.Filter(type = FilterType.ASSIGNABLE_TYPE, value = MovieDetailRepository.class))
public class App {

  public static void main(String[] args) {
    SpringApplication.run(App.class, args);
  }
}
4.3. Demo
Finally, we will create REST endpoints via controller class to test CRUD operations on DynamoDB.
@RestController
public class MovieController {
@Autowired
private MovieDetailRepository movieDetailsRepository;
@PostMapping("/movies")
public ResponseEntity addMovieDetails(@RequestBody MovieDetail movieDetail) {
MovieDetail updatedMovieDetail = movieDetailsRepository.save(movieDetail);
return ResponseEntity.created(URI.create("/" + updatedMovieDetail.getId())).build();
}
@GetMapping("/movies")
public List<MovieDetail> getAllMovieDetails() {
return (List<MovieDetail>) movieDetailsRepository.findAll();
}
@DeleteMapping("/movie/{id}")
public ResponseEntity deleteOneMovie(@PathVariable("id") String id) {
movieDetailsRepository.deleteById(id);
return ResponseEntity.accepted().build();
}
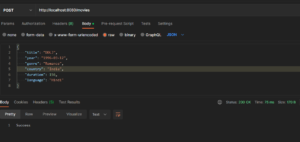
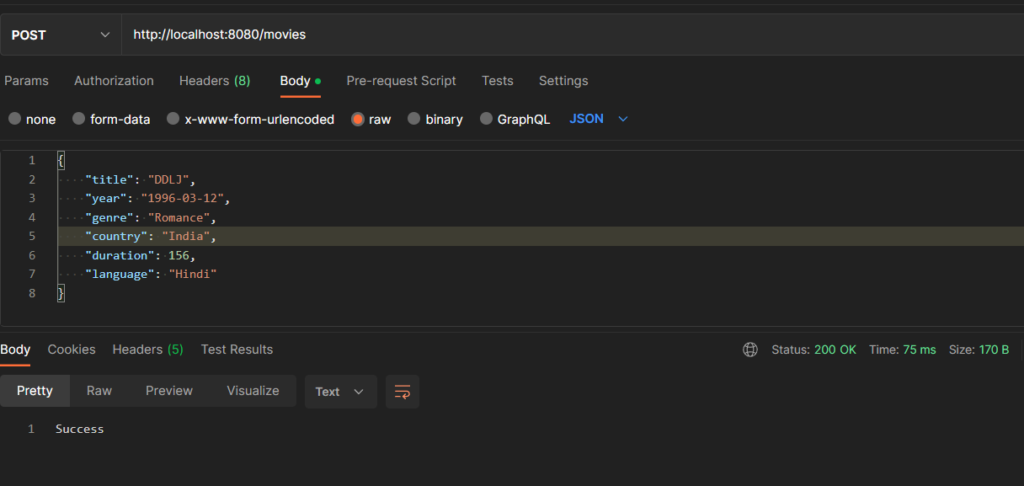
}Create New Movie Record: HTTP POST http://localhost:8080/movies
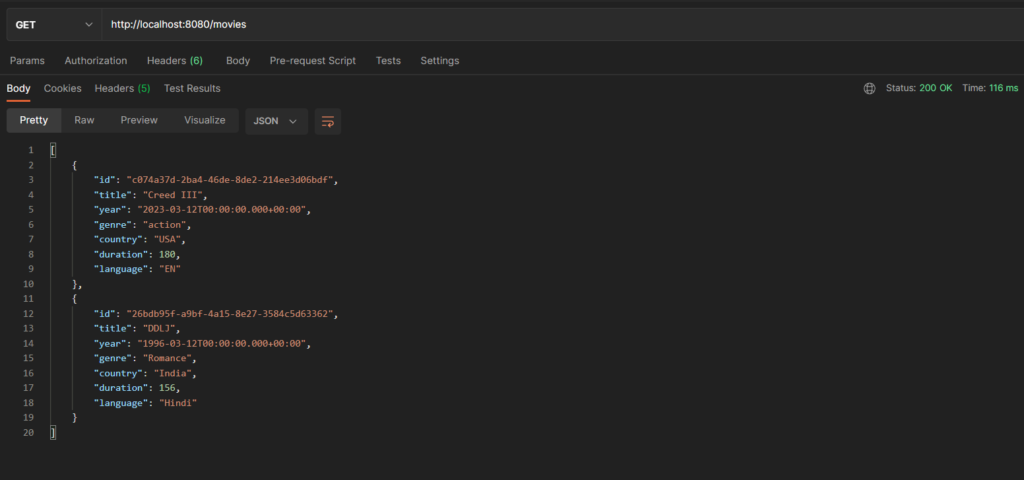
Fetch All Movies: HTTP GET http://localhost:8080/movies
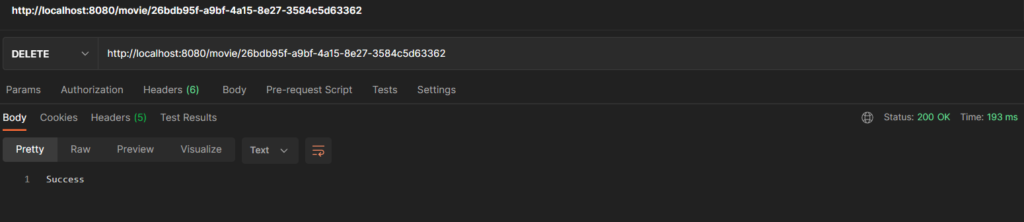
Delete a Movie by Id: HTTP DELETE http://localhost:8080/movie/{id}
5. CRUD Operations using DynamoDBMapper
5.1. Using DynamoDBMapper
We can autowire the DynamoDBMapper bean into a service class, and use its methods for performing the CRUD operations.
@Autowired
DynamoDBMapper dynamoDBMapper;
We can use the conventional save(), load() or delete() methods for performing the database operations.
save(Object object);
save(Object obj, DynamoDBMapperConfig config);

load(Class<T> class, Object hashKey);
load(Class<T> class, Object hashKey, DynamoDBMapperConfig config);

delete(Object object);- The save() operation has save-or-update semantics. This method saves the specified object to the table and updates the attributes corresponding to the mapped class properties.
- The load() method retrieves an item from a table in DynamoDB. To retrieve the desired item, the
the primary key of that item must be provided. - The delete() method allows the deletion of an item from a table. To perform this operation, an object instance of the mapped class must be passed in. If versioning is enabled, the item versions on both the client and server sides must match. However, if the SaveBehavior.CLOBBER option is used, the version does not need to match.
In save and load, we can also provide optional DynamoDBMapperConfig to specify additional settings, such as the consistency level and the table name override.
5.2. Demo
Let us see how we can use the DynamoDBMapper for performing various operations.
Movie movieDetails = new Movie("MOV001", "Avengers", new Date("2019-04-29"), "Action", "US", 175, "English");

//Create
mapper.save(movieDetails);

movieDetails.setTitle("Avengers Endgame");

//Update
mapper.save(movieDetails);


//Fetch
Movie fetchedMovieDetails = mapper.load(Movie.class, movieDetails.getId(),
		DynamoDBMapperConfig.builder()
			.withConsistentReads(DynamoDBMapperConfig.ConsistentReads.CONSISTENT)
			.build());

//Delete
mapper.delete(fetchedMovieDetails);
6. Batch Operations
We can use DynamoDBMapper to perform batch operations as well.
6.1. batchSave
The batchSave() method allows us to save objects to one or more tables in DynamoDB by utilizing the AmazonDynamoDB.batchWriteItem(). It’s important to note that this method does not ensure transaction guarantees.
batchSave(Iterable<? extends Object> objectsToSave);
batchSave(Object... objectsToSave);
Let us see an example.
Movie actionMovie = new Movie("MOV001", "Avengers", new Date("2019-04-29"), "Action", "US", 175, "English");
Movie thrillerMovie = new Movie("MOV002", "Mission Impossible", new Date("2018-07-27"), "Thriller", "US", 160, "English");

List<Movie> movieList = new ArrayList<>(Arrays.asList(actionMovie, thrillerMovie));

mapper.batchSave(movieList);
6.2. batchLoad
The batchLoad() function allows us to fetch several items from one or multiple tables by utilizing their primary keys.
batchLoad(Iterable<? extends Object> itemsToGet);
batchLoad(Map<Class<?>, List<KeyPair>> itemsToGet);
Let us see an example:
Movie actionMovie = new Movie();
actionMovie.setId("MOV001");

Movie thrillerMovie = new Movie();
thrillerMovie.setId("MOV002");

List<Movie> movies = new ArrayList<>(Arrays.asList(actionMovie, thrillerMovie));

Map<String, List<Object>> fetchedData = mapper.batchLoad(dataToFetch);
The key of the returned data is the table name since we can fetch data from multiple tables using batchLoad().
6.3. batchDelete
The batchDelete() method allows us to remove objects from one or more tables in Amazon DynamoDB by utilizing the AmazonDynamoDB.batchWriteItem() method. This method does not ensure transaction guarantees.
batchDelete(Iterable<? extends Object> objectsToDelete)
batchDelete(Object... objectsToDelete)
Let us see an example:
List<Movie> dataToDelete = new ArrayList<>(Arrays.asList(actionMovie, thrillerMovie));
mapper.batchDelete(movieList);
6.4. batchWrite
The mapper.batchWrite() function enables the saving and deletion of objects in one or multiple tables via calls to the AmazonDynamoDB.batchWriteItem() method. However, it is important to note that this method does not offer support for transaction guarantees or versioning such as conditional puts or deletes.
batchWrite(Iterable<? extends Object> objectsToWrite, Iterable<? extends Object> objectsToDelete)Let us see an example:
List<Movie> dataToSave = new ArrayList<>(Arrays.asList(actionMovie, thrillerMovie ));
List<Movie> dataToDelete = new ArrayList<>(Arrays.asList(actionMovie1, thrillerMovie1));

mapper.batchWrite(dataToSave, dataToDelete);
7. Transaction Operations
Similar to batch operations, we can perform the transaction operations using the mapper reference.
Opposite to batch operations, transaction operations provide transactional guarantees. We can use a transaction operation to load or save up to 25 items across multiple tables in a single transaction. If any of the write operations in the transaction fails, the entire transaction will be rolled back and none of the writes will be executed.
void transactionWrite(TransactionWriteRequest transactionWriteRequest);

List<Object> transactionLoad(TransactionLoadRequest transactionLoadRequest);
Let us see an example.
//Save-Update
TransactionWriteRequest transactionWriteRequest = new TransactionWriteRequest();

transactionWriteRequest.addPut(actionMovie);
transactionWriteRequest.addPut(thrillerMovie);

mapper.transactionWrite(transactionWriteRequest);

//Load
TransactionLoadRequest transactionLoadRequest = new TransactionLoadRequest();

transactionLoadRequest.addLoad(actionMovie);
transactionLoadRequest.addLoad(thrillerMovie)

List<Movie> list = mapper.transactionLoad(transactionLoadRequest);
8. Conclusion
This tutorial discussed how to connect to DynamoDB from a Spring Boot Application. By following the discussed steps, we can create the configuration classes and connect with DynamoDB.
Of course, after completing testing locally, we should be able to transparently use a deployed instance of DynamoDB on AWS and run the code with only minor configuration changes in the properties file.
APPLICATION FAILED TO START
***************************
Description:
Failed to configure a DataSource: ‘url’ attribute is not specified and no embedded datasource could be configured.
Reason: Failed to determine a suitable driver class
Action:
Consider the following:
If you want an embedded database (H2, HSQL or Derby), please put it on the classpath.
If you have database settings to be loaded from a particular profile you may need to activate it (no profiles are currently active).
Which version of Spring Boot?
Do I need to create a the table before running this? or the table creation is automatically done by @DynamoDbTable?
The creation of the table in DynamoDB is not automatic and needs to be handled separately. You can use
CreateTableRequestwhether the table exists and create it if needed.