
To run JUnit tests in Eclipse, we right-click a test class, a test method, a package or the whole project and select Run As > JUnit Test, or press Alt+Shift+X, T, and Eclipse shows the results in the JUnit view. Eclipse IDE 2026-09, the current release, runs JUnit 3, JUnit 4, JUnit 5 and JUnit 6 tests with the same commands.
We run tests from the IDE while we write code, because a single test runs in a second or two and a failure opens the right line with a double-click. The JUnit view also reruns the failed tests first, which is the fastest loop when we fix a bug.
The following example is the test class we run in this article. It is a regular JUnit 6.1.3 test class in a Maven project, and Eclipse needs nothing special in the code.
@DisplayName("Shopping cart")
class CartTest {

  @Test
  @DisplayName("is empty when created")
  void newCartIsEmpty() {
    assertTrue(cart.isEmpty());                   // passes
  }

  @Test
  @Disabled("Coupons are not implemented yet")
  void appliesCoupon() {                          // skipped
  }
}
Notice that the test methods are package-private and use the Jupiter annotations from org.junit.jupiter.api, which JUnit 5 and JUnit 6 share. We start with the project setup, run single tests and groups of tests, read the JUnit view, change the run configuration, and fix the two errors that Eclipse shows most often for JUnit. The last section creates tests faster with the wizard and code templates.
1. Preparing a Project for JUnit in Eclipse
Eclipse needs the JUnit jars on the build path of the project. For a Maven or Gradle project, the build file provides them, and Eclipse reads it when we import the project. For a plain Java project without a build tool, Eclipse adds its own JUnit library.
- Maven project. Add the junit-bom and junit-jupiter as shown in JUnit Maven dependency, and import the project with File > Import > Maven > Existing Maven Projects. After a change to pom.xml, Maven > Update Project (Alt+F5) refreshes the build path.
- Gradle project. Add the dependencies from JUnit Gradle dependency and import with File > Import > Gradle > Existing Gradle Project.
- Plain Java project. Open Project > Properties > Java Build Path > Libraries, select Add Library… > JUnit and choose JUnit 6. The quick fix Ctrl+1 on an unresolved @Test offers “Add JUnit 6 library to the build path” as well.
Eclipse added JUnit 6 support in release 2025-12 (4.38), and JUnit 6 needs Java 17 or later in the project. Older Eclipse releases still run JUnit 5 tests, so a team that cannot upgrade the IDE stays on JUnit 5.14.x.
2. How to Run JUnit Tests in Eclipse
Eclipse decides what to run from the current selection. The same menu entry runs one method or a whole project, depending on where we right-click, and the keyboard shortcut works in the editor and in the Package Explorer.
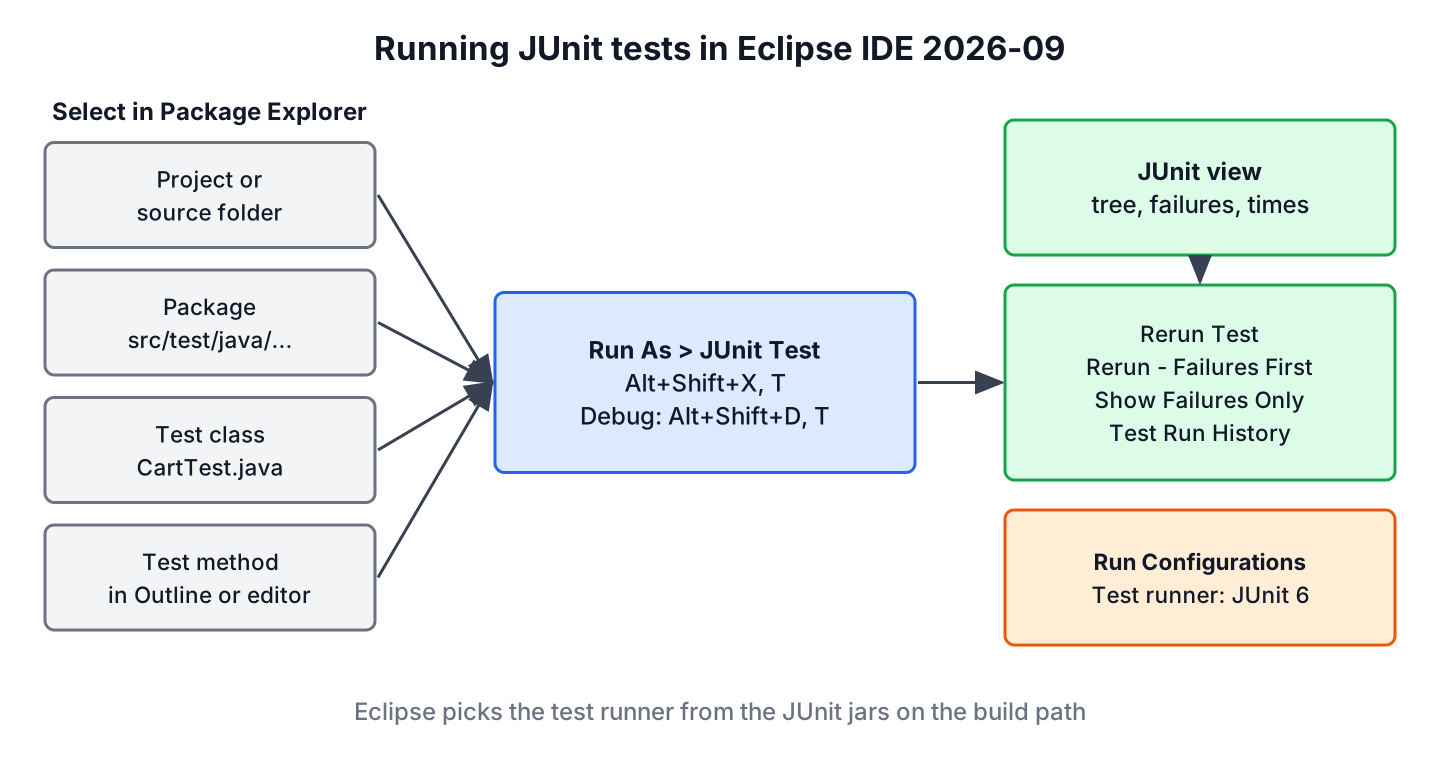
| What to run | Where to select it | Command |
|---|---|---|
| All tests of a project | Project or src/test/java in the Package Explorer | Run As > JUnit Test |
| All tests of a package | Package in the Package Explorer | Run As > JUnit Test |
| One test class | Class in the Package Explorer, or anywhere in the editor outside a method | Alt+Shift+X, T |
| One test method | Method name in the editor or in the Outline view | Alt+Shift+X, T |
| One test in debug mode | Same selections as above | Debug As > JUnit Test or Alt+Shift+D, T |
On macOS, the shortcuts use the Command and Option keys, Cmd+Option+X, T to run and Cmd+Option+D, T to debug. Both shortcuts are two-step key sequences, so we press the first combination, release it and press T.
A @Nested class and a parameterized test run like any other test. For the example class, the selection of rejectsInvalidQuantity runs both invocations of the parameterized test, and Eclipse lists them under their display names.
@Nested
@DisplayName("when adding items")
class AddingItems {

  @ParameterizedTest(name = "rejects quantity {0}")
  @ValueSource(ints = {0, -1})
  void rejectsInvalidQuantity(int quantity) {
    assertThrows(IllegalArgumentException.class, () -> cart.add("banana", quantity));
  }
}
3. Reading Results in the JUnit View
The JUnit view opens after each run. The top bar shows the counts of runs, errors and failures and turns green or red, and the tree below lists the tests by their display names. For CartTest, the tree has the outer class “Shopping cart”, the nested class “when adding items” with “rejects quantity 0” and “rejects quantity -1”, and the skipped test with the @Disabled reason.
The view toolbar has the commands we use most, and each command shows its name as a tooltip, which is also the name in the JUnit view documentation.
| Command | What it does |
|---|---|
| Rerun Test | Runs the same tests again |
| Rerun Test – Failures First | Runs the failed tests before the others, so we see after a few seconds whether a fix worked |
| Show Failures Only | Hides the passed tests in the tree |
| Show Skipped Tests Only | Shows only tests that were skipped by @Disabled or a failed assumption |
| Next Failed Test / Previous Failed Test | Jumps between failures |
| Test Run History | Switches between earlier runs, and imports or exports a run as an XML file |
| Show Execution Time | Shows the time of each test in the tree |
A double-click on a failed test opens the test method, and a double-click on a line of the Failure Trace opens that line of code. For an assertEquals() failure, the Compare Result button of the Failure Trace (tooltip “Compare Actual With Expected Test Result”) shows both values side by side, which helps with long strings. A right-click on a single test in the tree offers Run and Debug for that test alone.
The JUnit view reruns the tests with the same launch configuration, so a change to the build path or the VM arguments needs a new run from the editor. The next section shows where that configuration lives.
4. Changing the JUnit Run Configuration
Every Run As > JUnit Test creates a launch configuration. We edit it under Run > Run Configurations…, in the JUnit section on the left. The Test tab holds the selection (project, package, class or method), the Include and exclude tags setting and the Test runner field, which Eclipse fills from the JUnit version on the build path.
- The Test tab sets the test runner, which is JUnit 6 for the example project, and its Configure… button sets the include and exclude tags for tagged tests, such as skipping the tests tagged slow.
- The Arguments tab holds VM arguments, for example -Duser.timezone=UTC or a JUnit configuration parameter such as -Djunit.jupiter.execution.parallel.enabled=true.
- The JRE tab selects the JDK, which must be Java 17 or later for JUnit 6.
- The Common tab saves the configuration as a .launch file in the project, so the team can share it through version control.
The preference page Window > Preferences > Java > JUnit sets defaults for all new JUnit launches. It can add -ea to the VM arguments, so Java assert statements are checked during tests, and it holds the stack trace filters that hide JUnit and reflection frames in the Failure Trace.
5. Fixing No Tests Found and JUnit Version Conflicts
Most Eclipse JUnit problems come from a mismatch between the selected test runner and the JUnit jars on the build path. Eclipse names the problem in a dialog or in the launch configuration, and the message tells us which side to fix.
| Message | Cause | Fix |
|---|---|---|
| No tests found with test runner ‘JUnit 5’. | The run configuration uses another JUnit version than the tests, or the methods use org.junit.Test from JUnit 4 | Delete the old launch configuration and run again, or set the test runner to the version on the build path |
| JUnit 6 launch type is incompatible with JUnit 5 junit-jupiter-api found on project build path. | The launch configuration and the build path use different JUnit major versions | Align the versions in pom.xml or build.gradle and run Maven > Update Project |
| Cannot find class ‘org.junit.platform.commons.annotation.Testable’ on project build path | JUnit 5 and JUnit 6 jars are mixed, for example JUnit 6 on the build path with a JUnit 5 launch | Use one JUnit version, ideally through the junit-bom |
A test class that Eclipse does not offer to run at all has a different problem. Either it is not on a source folder of the build path, or the methods are private or static, which JUnit does not accept as test methods. Running mvn test from a terminal is a quick cross-check, because Maven ignores the Eclipse launch configuration.
mvn test -Dtest=CartTest6. Creating Tests Faster With the Wizard and Templates
Eclipse can create the test class for us. File > New > JUnit Test Case, or New > Other… > Java > JUnit > JUnit Test Case, opens a wizard with the option “New JUnit Jupiter test”. It names the class after the class under test, puts it into the test source folder with the same package and can create a test method stub for each selected method. If JUnit is missing on the build path of a plain Java project, the wizard offers to add the JUnit 6 library.
6.1. Built-in JUnit Templates
Templates insert code snippets through content assist. Inside a test class, we type the template name, press Ctrl+Space and pick the template from the list. Eclipse ships these JUnit templates for class members.
| Template name | Description in Eclipse | Inserts |
|---|---|---|
| test_jupiter | test method (JUnit Jupiter) | A @Test method with the static import of Assertions.* |
| test_factory | test factory method (JUnit Jupiter) | A @TestFactory method for dynamic tests |
| test4 | test method (JUnit 4) | A JUnit 4 @Test method |
| test | test method (JUnit 3) | A JUnit 3 testXxx() method |
The templates add the imports themselves. For the assertion methods in our own code, we add org.junit.jupiter.api.Assertions as a type under Window > Preferences > Java > Editor > Content Assist > Favorites, and content assist proposes assertEquals() and the other static methods without a manual import.
6.2. Importing Templates for Lifecycle Methods
Eclipse has no templates for @BeforeEach, @AfterEach or @ParameterizedTest. The example project contains a template file, junit-jupiter-templates.xml, with four templates for the Java members context.
| Template name | Inserts |
|---|---|
| setup_jupiter | A @BeforeEach void setUp() method with the import |
| teardown_jupiter | An @AfterEach void tearDown() method with the import |
| beforeall_jupiter | A @BeforeAll static void setUpAll() method with the import |
| param_jupiter | A @ParameterizedTest with a @CsvSource row, the imports and the static import of Assertions.* |
We import the file under Window > Preferences > Java > Editor > Templates with the Import… button. On macOS, the preferences open from the Eclipse application menu. The same page has New… to write our own templates, where the Insert Variable… button adds placeholders such as the cursor position or an import, and Export… to share them with the team.
7. Eclipse JUnit FAQs
Questions about Eclipse and JUnit 6 are mostly about IDE version support and single-test runs.
7.1. Does Eclipse Support JUnit 6?
Yes, since Eclipse IDE 2025-12 (4.38). The current release 2026-09 offers JUnit 6 in the test runner list, in the JUnit library container and in the new test wizard.
7.2. How Do I Run a Single Test Method in Eclipse?
Put the cursor on the method name in the editor, or select the method in the Outline view, and press Alt+Shift+X, T. To repeat one test from an earlier run, right-click it in the JUnit view and select Run.
7.3. Can We Save JUnit Results From Eclipse?
Yes. The Test Run History menu of the JUnit view has Export, which writes the run as an XML file, and Import…, which loads such a file or a JUnit XML report from a build. For results of the whole team, we use the XML reports of the CI build, because the Maven run on the CI server does not depend on the Eclipse setup of a single developer.
7.4. Can Eclipse Run Tests With Maven Instead of Its Own Runner?
Yes. A right-click on the project and Run As > Maven test runs mvn test with the Maven integration of Eclipse and shows the Maven console output. The JUnit view is faster for single tests, and the Maven run matches the CI build.
7.5. How Do I Disable a Test From the Eclipse Editor?
Since Eclipse 2026-03 (4.39), the quick assist Ctrl+1 inside a test offers “Disable test with @Disabled”, and on a disabled test it offers “Enable test (remove @Disabled)”.
8. Conclusion
Eclipse runs JUnit tests from the current selection. Run As > JUnit Test or Alt+Shift+X, T runs a method, a class, a package or a project, and Alt+Shift+D, T does the same in the debugger. The JUnit view shows the tree with display names and offers the rerun with failures first, which keeps the fix-and-test loop short.
JUnit 6 works in Eclipse 2025-12 and later, and Eclipse picks the test runner from the JUnit jars on the build path. When it complains about no tests or a JUnit version conflict, the build path and the launch configuration disagree. The wizard and templates save typing for new tests, and the JUnit tutorial covers the tests we write with them.
9. References
- Eclipse JDT User Guide – Writing and Running JUnit Tests
- Eclipse JDT User Guide – JUnit View
- Eclipse JDT User Guide – JUnit Preferences
- Eclipse JDT User Guide – Java Editor Templates
- Eclipse 4.38 (2025-12) JDT New and Noteworthy
- Eclipse IDE 2026-09 Packages
- JUnit 6.1.3 User Guide – IDE Support
Happy Learning !!

How to run the Same suite using maven command.
mvn -Dtest=>testsuiteName> testI got below error: