This Spring security tutorial will explore how to use Keycloak and Spring Security OAuth2 module to implement authentication and authorization in a spring boot application. We will walk step-by-step from configuring a security realm in Keycloak server and using this realm for authentication/authorization of a REST API developed using Spring Boot 3.
1. Prerequisites
To follow this tutorial, we should have a basic understanding of the following:
- What are authentication and authorization?
- OAuth2 basics
- Spring boot basics
- Spring Security basics
2. Install and Setup Keycloak
2.1. Installation
There are several methods to install Keycloak, including:
- Standalone distribution is the most common method of installing Keycloak, where we download the standalone server distribution from the official website, unzip it, and start the server.
- Docker can also be used to install by pulling the Keycloak image from Docker Hub and running it as a container.
In this article, we will use Docker to easily install and run Keycloak. We can download and start the Keycloak container by running the following commands in the terminal:
docker pull quay.io/keycloak/keycloak:latestRun the following command starts the Keycloak container with the specified username and password for the Keycloak Administration Console. It also maps port 8180 of the container to port 8180 of the host machine.
docker run --name keycloak_server -p 8180:8180 \
		-e KEYCLOAK_ADMIN=admin \
		-e KEYCLOAK_ADMIN_PASSWORD=password \
		quay.io/keycloak/keycloak:latest \
		start-dev \
		--http-port=8180
Once the container is started, we can access the Keycloak Administration Console by opening a web browser and going to http://localhost:8180.
2.2. Setting Up a New Realm
Follow the instructions given in getting started with Keycloak for configuring the realm, users and roles. For this tutorial, we are using the following configuration:
Realm name: howtodoinjava-realm
ClientId: employee-management-api
Client Secret: <generated>
Username: test-user
Password: password
Role: USER
3. Spring Boot Configuration
In this article, we are reusing the APIs created for Vue.js application with Spring Boot. Here, Spring boot application will be modified to act as OAuth client and Keycloak will be used as authorization server.
3.2. Maven
To configure Spring Boot Security Oauth2 to use Keycloak as Identity Provider, we need to add the following Maven dependencies:
- spring-boot-starter-security: provides all the necessary dependencies to use Spring Security, including the core library, configuration, and other features, including authentication and authorization.
- spring-boot-starter-oauth2-client: provides support for OAuth2-based authentication and authorization.
<dependency>
    <groupId>org.springframework.boot</groupId>
    <artifactId>spring-boot-starter-security</artifactId>
</dependency>

<dependency>
    <groupId>org.springframework.boot</groupId>
    <artifactId>spring-boot-starter-oauth2-client</artifactId>
</dependency>
3.2. OAuth2 Client Configuration
In the application.properties file, add the following properties. We can access the property values in the “Client” section of the Keycloak admin console. Replace the client-id and client-secret values with the values for your Keycloak client. Also, replace the realm name as you configured in Keycloak.
A recommended approach is to store them as environment variables that can be accessed securely by the application at runtime. This helps to protect the client id and secret from being exposed in the source code, which could potentially lead to a security breach.
server.port=9090

spring.security.oauth2.client.registration.keycloak.client-id=employee-management-api
spring.security.oauth2.client.registration.keycloak.client-secret=--generated--
spring.security.oauth2.client.registration.keycloak.scope=openid
spring.security.oauth2.client.registration.keycloak.authorization-grant-type=authorization_code
spring.security.oauth2.client.registration.keycloak.redirect-uri=http://localhost:9090/login/oauth2/code/employee-management-api
spring.security.oauth2.client.provider.keycloak.issuer-uri=http://localhost:8180/realms/howtodoinjava-realm
The equivalent Java configuration is:
@Bean
public ClientRegistrationRepository clientRepository() {

	ClientRegistration keycloak = keycloakClientRegistration();
	return new InMemoryClientRegistrationRepository(keycloak);
}

private ClientRegistration keycloakClientRegistration() {

	return ClientRegistration.withRegistrationId("howtodoinjava-realm")
		.clientId("employee-management-api")
		.clientSecret("--generated--")
		.redirectUri("http://localhost:9090/login/oauth2/code/employee-management-api")
		.authorizationGrantType(AuthorizationGrantType.AUTHORIZATION_CODE)
		.issuerUri("http://localhost:8180/realms/howtodoinjava-realm")
		.authorizationUri("http://localhost:8080/realms/howtodoinjava/protocol/openid-connect/auth")
		.tokenUri("http://localhost:8180/realms/howtodoinjava/protocol/openid-connect/token")
		.userInfoUri("http://localhost:8180/realms/howtodoinjava/protocol/openid-connect/userinfo")
		.build();
}
After detecting these properties, Spring boot auto-configuration will set up the necessary components to enable authentication/authorization with Keycloak (using OAuth2ClientAutoConfiguration class ).
5.3. Spring Security
Currently, Spring Security still uses the default authentication workflow, including the default login page and the UsernamePasswordAuthenticationFilter. To change this behavior and force Spring Boot to use the OAuth2 protocol for login, we need to replace the .loginForm() method with .oauth2Login().
@Configuration
@EnableWebSecurity
public class SecurityConfig {

    @Bean
    public SecurityFilterChain securityFilterChain(HttpSecurity httpSecurity) throws Exception {

        httpSecurity.authorizeHttpRequests()
                .requestMatchers("/public").permitAll()
                .anyRequest().authenticated()
                .and()
                .oauth2Login();

       return  httpSecurity.build();
    }
}
5.4. OAuth Client Registrations
Spring Security will automatically create a ClientRegistrationRepository (by default InMemoryClientRegistrationRepository instance to store ClientRegistration objects in memory ) and register the client specified in the application.properties file (in our case, keycloak).
The ClientRegistrationRepository interface is part of Spring Security’s OAuth2 client support and it serves as a central repository for managing client registrations. It provides methods for retrieving the ClientRegistration object by their registration ID, getting a list of all registered clients, and adding or removing a client registration.
A ClientRegistration interface represents a client registration with an OAuth2/OIDC provider such as Keycloak, Github, Google etc. It contains information such as the client ID, client secret, redirect URI, authorization grant type, issuer URI, token URI, and other properties needed for authenticating and authorizing with the provider.
The .oauth2Login() method configures the application to use OAuth 2.0 for authentication. This method sets up the necessary configuration for the OAuth 2.0 login flow, including setting the authentication endpoint and callback URL. (It adds the OAuth2AuthorizationRequestRedirectFilter & OAuth2LoginAuthenticationFilter to the filter chain).
6. Test
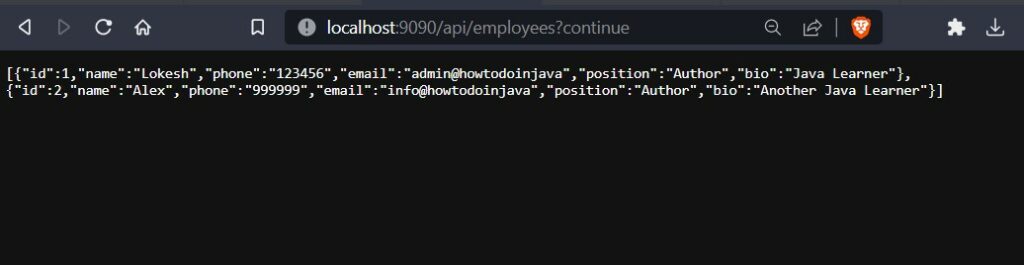
Now let’s try to access one of the endpoints that we have in the EmployeeRestAPI /api/employees (protected endpoint), we will be redirected automatically to the login page of the keycloak server.
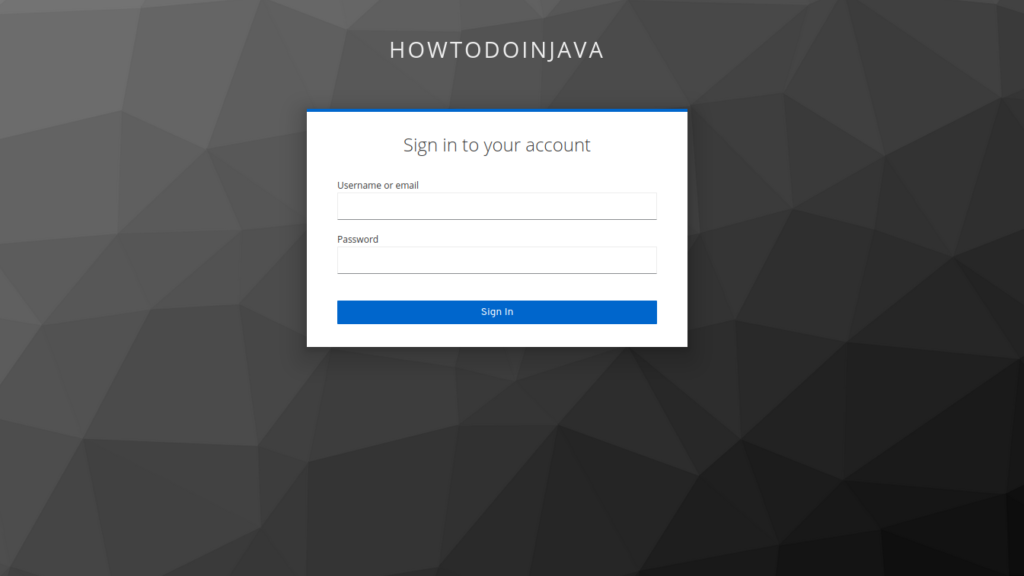
Provide the credentials of the user we just created (test-user/password), and you will be granted access to the endpoint and a successful response will be returned.
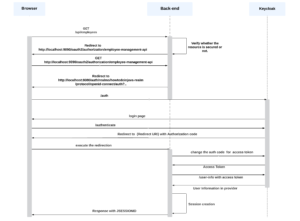
7. Authentication Flow
The following diagram depicts the process when a user requests a protected resource. Spring Security will redirect the user to Keycloak for authentication. After successful authentication, our backend will create a session for the user based on the information provided by Keycloak.

Here is the workflow of OAuth2 authentication using Spring Security and Keycloak, when a user sends a request to /api/employee:
- The user sends a request to /api/employees.
- Spring Security (OAuth2 Filter) intercepts the request and checks if the user is authenticated. If not, Spring Security redirects the user to the Keycloak login page.
- The user enters their credentials on the Keycloak login page and submits the form.
- Keycloak verifies the user’s credentials and generates an authorization code, which is sent to the redirect URI.
- Spring Security requests Keycloak with the authorization code to get an access token.
- Keycloak returns the access token to our Spring Boot app.
- Spring Security requests the /user-info endpoint to get the user’s information.
- The session is created.
8. Conclusion
Integrating Spring Boot Security with OAuth2 client and Keycloak can greatly enhance the security of an application. With Keycloak as the identity provider, we can centralize the management of users and access control policies, while Spring Security provides a flexible and customizable framework for securing the application’s resources.
Through the use of the OAuth2 protocol, we can enable seamless and secure authentication and authorization flows, while also allowing for fine-grained control over access to specific resources.
Happy Learning !!
From keycloak login page, how should I redirect to react UI page?
You should configure the redirect URL in your Keycloak client settings.
1. Login to your Keycloak Admin Console.
2. Navigate to the “Clients” section and select your client.
3. Go to the “Settings” tab.
4. Set the “Valid Redirect URIs” to include the URL of your React UI. This is the URL that Keycloak will redirect to after a successful login.
Yes, it’s working fine. Thank you so much! Now, the application redirects to the React UI. Is it possible to pass the username/client ID to the React UI? I need to obtain a bearer token to make calls to backend endpoints. Since we are using OAuth2 configuration, backend calls are not allowed without a bearer token. Could you please assist me with this?
Include User Information in ID Token. You can customize the ID token claims in the Keycloak client settings. Look for the “ID Token” tab, and include the desired claims (such as the username or client ID). After a successful login, Keycloak will provide you with an ID token that contains the requested user information. In your React UI, you can extract this information from the ID token.
import jwt_decode from 'jwt-decode';const token = // Get the ID token from Keycloak after login
const decodedToken = jwt_decode(token);
const username = decodedToken.preferred_username; // Assuming 'preferred_username' is the claim for the username
Yes , even I’m facing the same issue ,unable to provide access to the API based on roles made in keycloak. Have used PreAuthorize and hasRole in the security config but didn’t work.
Thanks for the awesome tutorial. Can you tell me more how I can use your settings to provide access to the API only by roles? Tried through PreAuthorize and hasRole in the security config, but it didn’t work.
Ideally, those annotations should have worked. I will try to find time to play around it.
I also tried with Preauthorize annotation and hasRole, hasAuthority methods in SecurityFilterChain to authorize users to the API’s based on roles but it didn’t work. Could you please tell me how to do it? By the way I have also used “Oauth2 Resource Server” which converts Keycloak roles to Spring roles along with “Oauth2 Client”.
I’m basically following the directions here with Vaadin, but I cannot get Spring Security to understand the roles in the token. They are there, but @RolesRequired does not work, always denies access. @PermitAll allows access if logged in, regardless of roles.
1. I hope you are using VaadinWebSecurity.
2. Inject the JwtAuthenticationToken object into a method and inspect the object if it has necessary roles you are expecting.
String roles = jwt.getAuthorities().stream().map(GrantedAuthority::getAuthority).collect(Collectors.joining(“,”))
For example:
3. Make sure KeyCloak roles are being populated as Spring SimpleGrantedAuthority. Define this bean in Spring security configuration.
And inject into SecurityFilterChain.
http.oauth2ResourceServer(resourceServer -> {
resourceServer.jwt(jwtDecoder -> {
jwtDecoder.jwtAuthenticationConverter(jwtAuthenticationConverter());
});
});
Yeah, it was part 3 that I was missing. Not using resource server, though, but principle is the same I guess.
Fix here: https://vaadin.com/blog/a-minimal-openid-connect-oidc-secured-vaadin-flow-application-with-spring-boot
Now @RolesRequired works, thanks :-)
i have also used preAuthorized and hasRole but its not working and also my springboot application is not able to extract client roles form the token.
So, if I want to create user or use some function in keycloak such as: search user, create user, how can I do it can you help me?
Does this article has the required information? If not, what exactly you seek?
Actually the value in application.properties should be
Not really. It is the response from /.well-known/openid-configuration API. More information on this Github issue.
{"issuer": "http://localhost:8180/realms/howtodoinjava-realm",
"authorization_endpoint": "http://localhost:8180/realms/howtodoinjava-realm/protocol/openid-connect/auth",
"token_endpoint": "http://localhost:8180/realms/howtodoinjava-realm/protocol/openid-connect/token",
"introspection_endpoint": "http://localhost:8180/realms/howtodoinjava-realm/protocol/openid-connect/token/introspect",
"userinfo_endpoint": "http://localhost:8180/realms/howtodoinjava-realm/protocol/openid-connect/userinfo",
"end_session_endpoint": "http://localhost:8180/realms/howtodoinjava-realm/protocol/openid-connect/logout",
"frontchannel_logout_session_supported": true,
"frontchannel_logout_supported": true,
...
...
And it is a good idea to populate these values dynamically from /openid-configuration API response to avoid such confusion.