Resilience4j is a lightweight library used for building resilient and fault-tolerant systems. It has various features such as Circuit Breaker, Rate Limiting, Retry, Bulkhead etc.
In this article, we will focus on bulkhead and rate limiting using Resilience4j 2 in a spring boot 3 application.
Resilience4j v2.0 requires Java 17 and above.
1. What are Rate Limiting and Bulkhead?
At a high level, rate limit and bulkhead look like the same concept, but they are different.
- Rate Limiting: Rate limiting defines how often an operation is allowed in a specified duration. This avoids overloading the server and helps in preventing denial of service attacks.
- Bulkhead: Bulkhead limits the number of concurrent remote operations at any given time. This helps in preventing system failures.
| Rate Limit | Bulkhead |
|---|---|
| Limit the total number of calls for a specified period | Limit the total number of concurrent/parallel executions |
| Used to prevent Denial of Service attacks | Used to prevent failures in a system/API from affecting other systems/APIs |
| E.g.: Allow 10 parallel calls maximum at any point in time | E.g., Allow 10 parallel calls maximum at any point in time |
In a nutshell, if we have an API with a sub-millisecond response time, we can use a rate limit to prevent API abuse. Whereas if we have a computation and time-intensive API, we may go ahead with bulkhead to prevent the system from crashing.
2. Setup
Let’s create a sample Spring Boot application. It would have a single endpoint to fetch the student’s name using student id.
2.1. Maven
Start with adding the latest version of resilience4j-spring-boot3 dependency in pom.xml to enable the various modules of resilience4j.
The resilience4j would need the Spring AOP and actuator dependencies as pre-requisite, so we would have to add them as well. Since we would expose our endpoints via a GET call, we would add the Spring web dependency.
<dependency>
	<groupId>org.springframework.boot</groupId>
	<artifactId>spring-boot-starter-actuator</artifactId>
</dependency>
<dependency>
	<groupId>org.springframework.boot</groupId>
	<artifactId>spring-boot-starter-aop</artifactId>
</dependency>
<dependency>
	<groupId>org.springframework.boot</groupId>
	<artifactId>spring-boot-starter-web</artifactId>
</dependency>

<dependency>
	<groupId>io.github.resilience4j</groupId>
	<artifactId>resilience4j-spring-boot3</artifactId>
</dependency>
2.2. REST API
We have a single controller named StudentController. It has two endpoints: /student/{id} and /course/{id}.
@RestController
public class StudentController {

	@GetMapping(value = "/student/{id}")
	public ResponseEntity getStudentById(@PathVariable int id) {

		return ResponseEntity.ok("Details requested for " + id);
	}

	@GetMapping(value = "/course/{id}")
	public ResponseEntity getCourse(@PathVariable int id) {

		try {
			Thread.sleep(1000);
		} catch (InterruptedException e) {
			e.printStackTrace();
		}
		return ResponseEntity.ok("Course" + id);
	}
}
3. Rate Limiting
Rate limiting allows configuring the window of the time period between which a predefined number of calls would be allowed, irrespective of the time taken by each call to be complete.
3.1. @RateLimiter
@RateLimiter is the annotation used to rate-limit an API call and applied at the method or class levels. If applied at the class level, it applies to all public methods. This annotation takes two parameters. First, the name of the rate limiter and second, the fallback method to be invoked via fallbackMethod. The fallback method is optional and would be invoked if the request is not permitted to be executed due to the limits we set in our configurations.
To enable rate limiting on the student endpoint, we would annotate the getStudent with the @RateLimiter annotation and here we declare the fallback Method rateLimitingFallback().
The fallback method would mimic the parameters of the getStudent() method with the addition of a Throwable argument which in this case would be an instance of io.github.resilience4j.ratelimiter.RequestNotPermitted.
@RestController
public class StudentController {

	@GetMapping(value = "/student/{id}")
	@RateLimiter(name = "rateLimitingAPI", fallbackMethod = "rateLimitingFallback")
	public ResponseEntity getStudentById(@PathVariable int id) {

		return ResponseEntity.ok("Details requested for " + id);
	}

	public ResponseEntity rateLimitingFallback(int id, RequestNotPermitted ex) {

		HttpHeaders responseHeaders = new HttpHeaders();
		responseHeaders.set("Retry-After", "60s"); // retry after one second

		return ResponseEntity.status(HttpStatus.TOO_MANY_REQUESTS)
			.headers(responseHeaders) // send retry header
			.body("Too Many Requests - Retry After 1 Minute");
	}
}
Having a fallback method is a good practice if we need to have custom handling for an API that is rate limited.
If we don’t have a fallback method, RequestNotPermitted will result in unhandled failures. To avoid unhandled exceptions, we can have a global exception handler using @ExceptionHandler.
@ControllerAdvice
public class GlobalExceptionHandler extends ResponseEntityExceptionHandler
{
	@ExceptionHandler({ RequestNotPermitted.class })
	@ResponseStatus(HttpStatus.TOO_MANY_REQUESTS)
	public void requestNotPermitted() {
	}
}
3.2. Default Rate Limit Values and Properties Configuration
There are 3 main configurations that we would need to configure in our application properties:
| Config property | Default value | Description |
|---|---|---|
| timeoutDuration | 5 seconds | 500 nanoseconds |
| limitRefreshPeriod | 500 nano seconds | specifies the time window to count the requests. |
| limitForPeriod | 50 | specifies how many requests or method invocations are allowed in the above limitRefreshPeriod. |
We can override the rate limiter values in the properties configuration.
resilience4j.ratelimiter.instances.rateLimiterAPI.limitRefreshPeriod=1s
resilience4j.ratelimiter.instances.rateLimiterAPI.limitForPeriod=10
resilience4j.ratelimiter.instances.rateLimiterAPI.timeoutDuration=0s

# Configuration for another limiter 'rateLimiterApi_2'

resilience4j.ratelimiter.instances.rateLimiterApi_2.limitRefreshPeriod=500ms
resilience4j.ratelimiter.instances.rateLimiterApi_2.limitForPeriod=6
resilience4j.ratelimiter.instances.rateLimiterApi_2.timeoutDuration=3s

# health endpoint will still report "UP" even if one of the component's circuit breakers is in an open or half-open state.
resilience4j.ratelimiter.instances.rateLimiterApi_2.allowHealthIndicator-to-fail=false

#Buffer size to store the ratelimiter events
resilience4j.ratelimiter.instances.rateLimiterApi_2.eventConsumerBufferSize=50
resilience4j.ratelimiter.instances.rateLimiterApi_2.subscribeForEvents=true
4. BulkHead
Bulkhead allows configuring the maximum number of concurrent calls allowed to be executed in a given timeframe. It is named after the sectioned partitions in a ship’s hull. If a section of the hull is compromised, only that section would be flooded, preventing the whole ship from sinking. Comparing it with a real-world example, if we have an API endpoint that takes too long to execute, bulkhead will prevent other services (endpoints) of the application from being affected.
4.1. @Bulkhead
@Bulkhead is the annotation used to enable bulkhead on an API call. This can be applied at the method level or a class level. If applied at the class level, it applies to all public methods. This annotation takes two parameters. First, the name of the bulkhead and second, the fallback method to be invoked via fallbackMethod.
The fallback method is optional and would be invoked if the request is not permitted to be executed due to the limits we set in our configurations.
To enable bulkhead on the getCourse API, we have defined the bulkhead with name as courseBulkheadApi and fallbackMethod as bulkheadFallback.
The fallback method would mimic the parameters of the getCourseThrowable argument which in this case would be an instance of io.github.resilience4j.bulkhead.BulkheadFullException
@RestController
public class StudentController {

  @GetMapping(value = "/course/{id}")
  @Bulkhead(name = "courseBulkheadApi", fallbackMethod = "bulkheadFallback")
  public ResponseEntity getCourse(@PathVariable int id) {

    try {
      Thread.sleep(1000);
    } catch (InterruptedException e) {
      e.printStackTrace();
    }
    return ResponseEntity.ok("Course" + id);
  }

  public ResponseEntity bulkheadFallback(int id, BulkheadFullException ex) {

    return ResponseEntity.status(HttpStatus.BANDWIDTH_LIMIT_EXCEEDED)
        .body("Too many request - No further calls are accepted");
  }
}
If we don’t have a fallback method, BulkheadFullException will occur, resulting in unhandled failures. Consider adding a @ExceptionHandler to handle it.
@ControllerAdvice
public class GlobalExceptionHandler extends ResponseEntityExceptionHandler
{
	@ExceptionHandler({ BulkheadFullException .class })
	@ResponseStatus(HttpStatus.BANDWIDTH_LIMIT_EXCEEDED)
	public void bandwidthExceeded() {
	}
}
4.2. Default Bulkhead Values and Properties Configuration
There are 2 main configurations that we would need to configure in our application properties:
| Config property | Default value | Description |
|---|---|---|
| maxConcurrentCalls | 5 | Number of concurrent calls allowed |
| maxWaitDuration | 10 ms | Wait for 10ms before failing in case of the limit breach |
We can override the rate limiter values in the properties configuration.
With the following configuration, we want to limit the maximum number of concurrent calls to 10, so each thread can wait for only 100ms if the bulkhead is full. After that, the requests will be rejected with the BulkheadFullException exception.
resilience4j.bulkhead.instances.courseBulkheadApi.maxConcurrentCalls=10
resilience4j.bulkhead.instances.courseBulkheadApi.maxWaitDuration=100ms
5. Register Health Checks with Actuator
Using the following configuration, we can register the health check indicator with the Spring boot actuator module. Check out all the supported properties in Github.
management.endpoints.web.exposure.include=*  #To expose all endpoints
management.endpoint.health.show-details=always  # To show all details in /health endpoint.

management.health.ratelimiters.enabled=true  # To enable RateLimiters health check.

resilience4j.ratelimiter.metrics.enabled=true  # To enable the ratelimiter-metrics.
resilience4j.bulkhead.metrics.enabled=true  # To enable the bulkhead-metrics.

resilience4j.ratelimiter.instances.rateLimitingAPI.registerHealthIndicator=true
resilience4j.ratelimiter.instances.courseBulkheadApi.registerHealthIndicator=true
6. Demo
To test the rate limit and bulkhead configurations, we are using Apache JMeter. If you have not already, it is recommended to go through the getting started guide for JMeter.
6.1. Testing Rate Limit
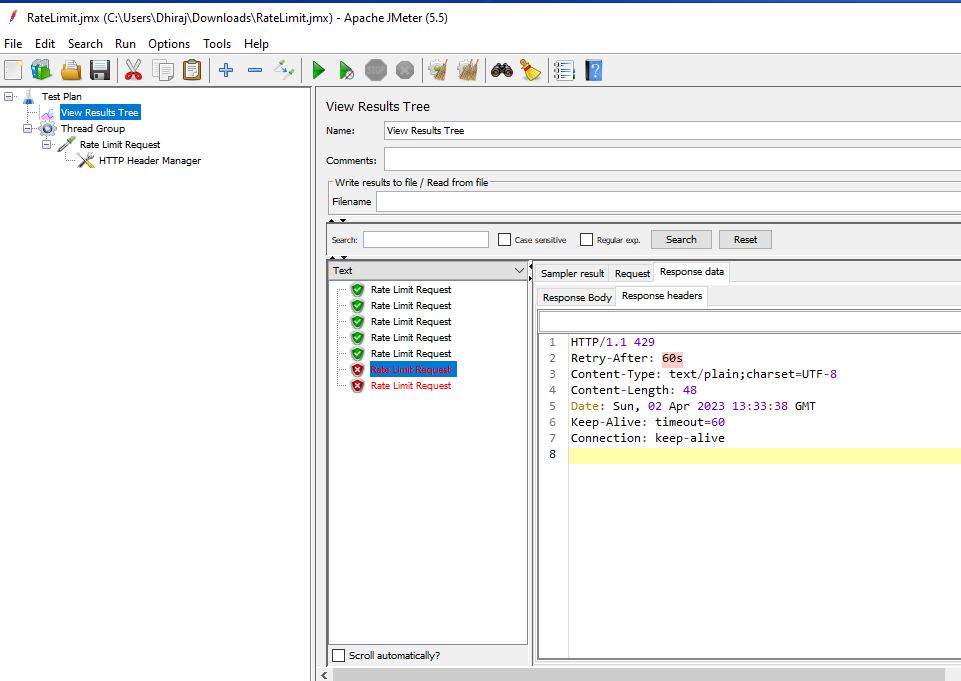
Since we have set the rate limiting in our application to allow 5 calls every 60 seconds, we will test our application by sending 7 calls to the API.
The thread group configuration will look like this:
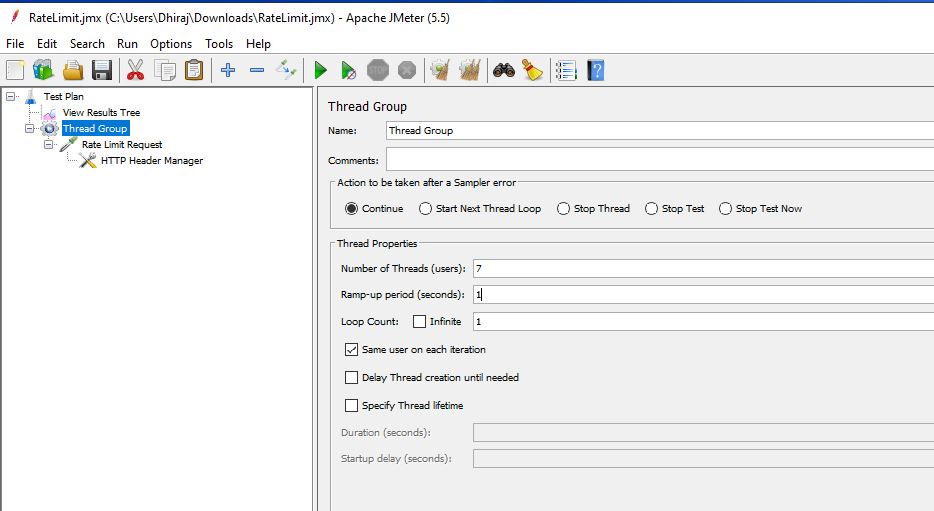
We will call the student endpoint with 7 users, each with a delay of 1 second denoted by the ramp-up period.
As expected, we should see the first 5 calls pass and the rest fail.
6.2. Testing Bulkhead
Let’s test the course API with 10 threads with a ramp-up period of 2 seconds.
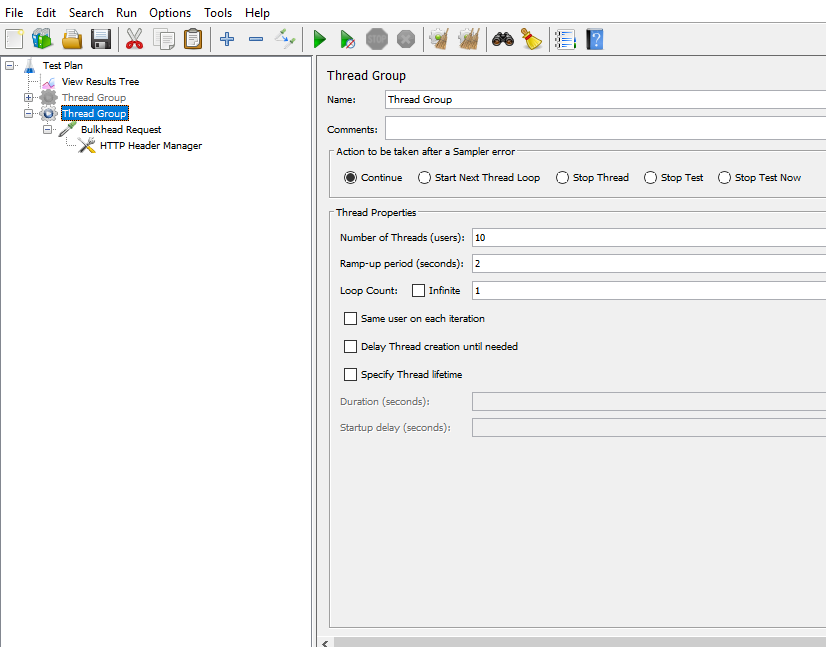
As we have a Thread.sleep() call in the course API to simulate the time-intensive API, testing the application produces the expected results, and the 11th request fails.

7. Conclusion
This tutorial taught us about rate limiting and bulkhead using Resialence4j2 and how to configure these in a Spring Boot 3 application. We also learned how to test the configured values using Apache JMeter.
Happy Learning !!